
A Fundamental Guide to NestJS - How To Get Started
An overview of NestJS fundamentals and essential development concepts, covering everything from application architecture and database integration to authentication, security, testing, and deployment through practical examples.
We are going to build a real REST API together, one small concept at a time. By the final step, our system will have a clean module structure, a database, validation, configuration, middleware, guards, interceptors, exception handling, JWT authentication, role-based access, security hardening, tests, and a Docker image ready for production.
Every step follows the same rhythm. First we look at the idea in an animated diagram. Then we write the code. Then we recap what we just learned, so the next step always starts from solid ground.
Our running project is a Cats API. It is small enough to hold in our heads and rich enough to show every important NestJS feature.
Versions used in this guide: NestJS 11 (Express 5 under the hood), TypeScript, and Node.js 20 or newer. Node 22 LTS is a comfortable choice.
Step 1: What is NestJS?

NestJS is a framework for building server-side applications with Node.js and TypeScript. It does not replace Node.js; it runs on Node.js and provides an application architecture on top of the underlying HTTP platform.
Look at the stack in the animation from the bottom up:
- Node.js runs our JavaScript code. We usually write that code in TypeScript, which is compiled to JavaScript before it runs.
- Express (or Fastify) is the HTTP server doing the low-level work. By default, Nest uses Express.
- NestJS adds structure: modules, dependency injection, decorators, and a clear request pipeline.
- Our application is then mostly controllers and services, which is exactly where we want to spend our time.
Why are we choosing it? Four reasons:
- TypeScript first. We get autocompletion and compile-time safety everywhere.
- Opinionated structure. Every Nest project looks familiar, so teams move quickly and new people find their way around.
- Dependency injection built in. We stop creating objects by hand and let the framework wire them up.
- Easy to test. Because dependencies are injected, replacing them with mocks is simple.
Quick recap
- NestJS is a layer on top of Node.js and Express/Fastify.
- It gives our code structure, not just routes.
Step 2: Setting up with the Nest CLI
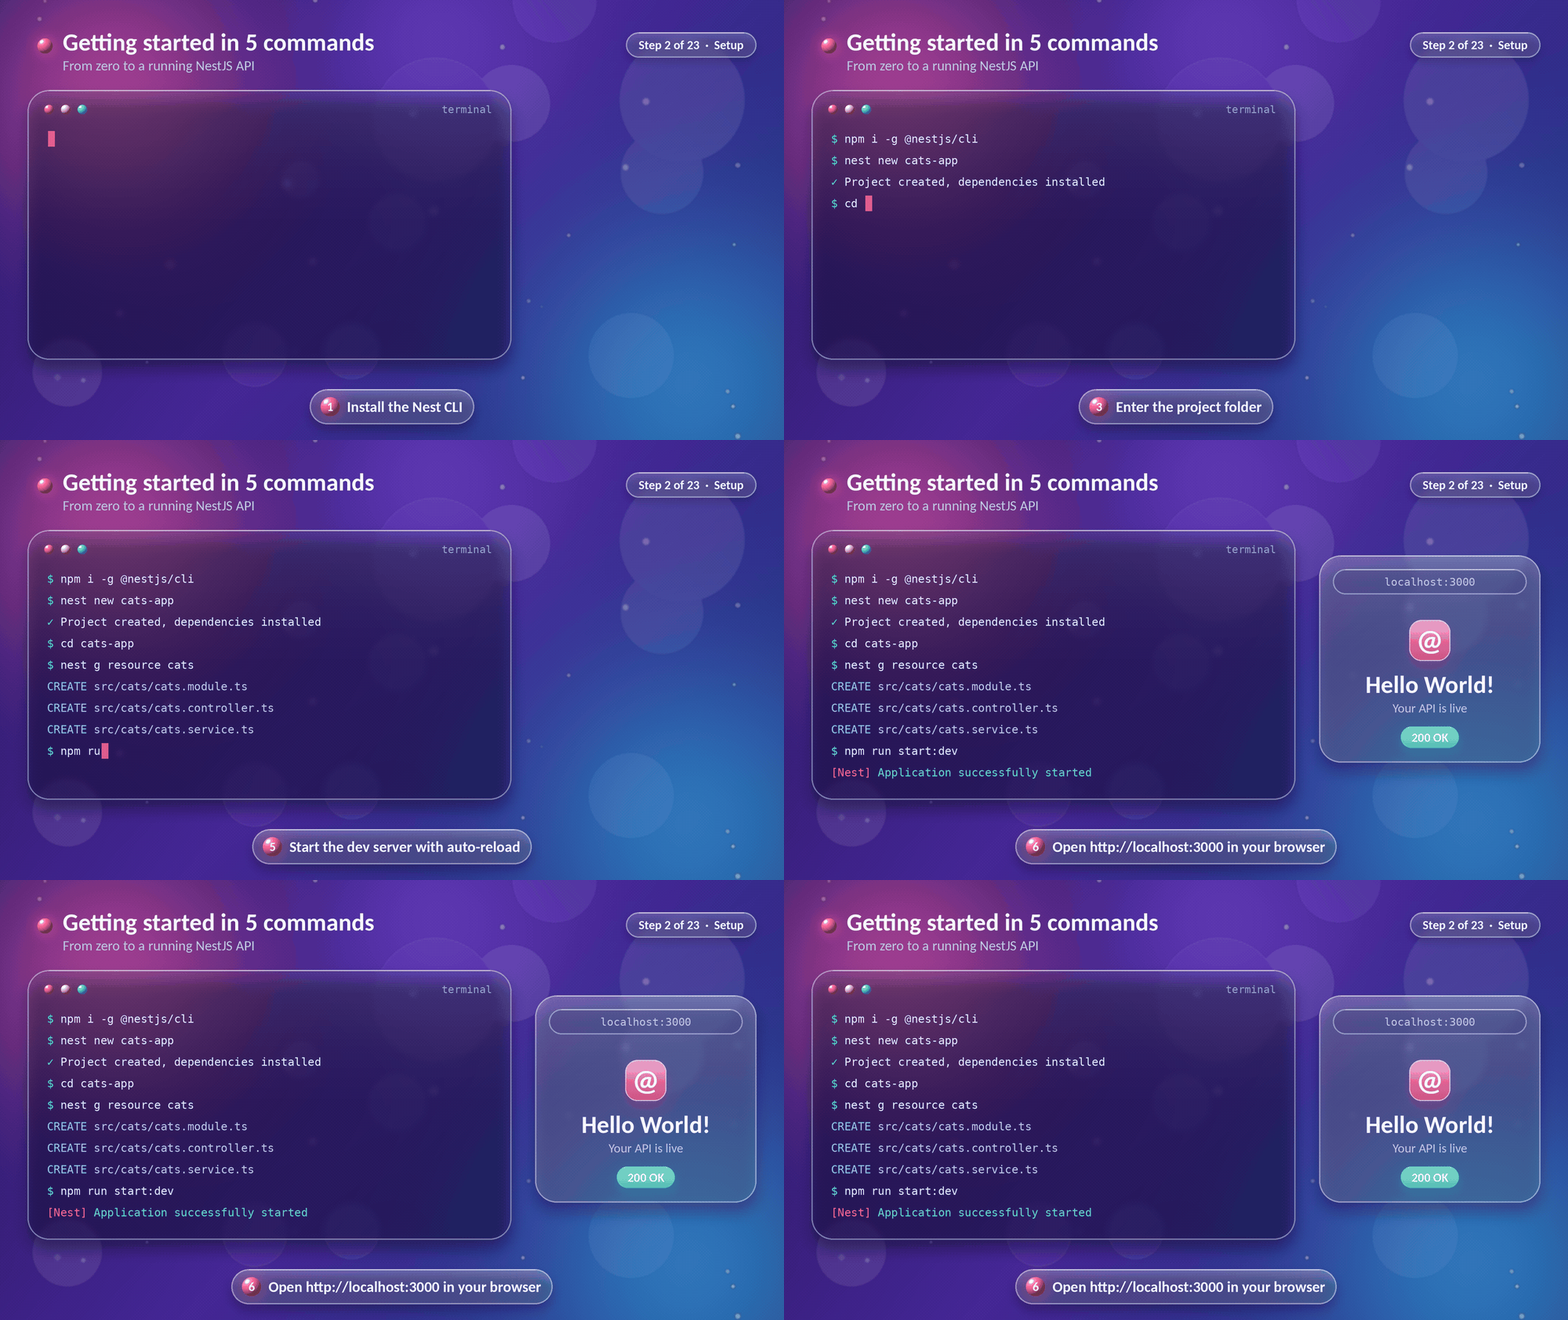
We are going to scaffold our project with the official CLI. First we make sure Node.js is recent enough:
node --version # v20 or newer
Then we install the CLI and create the project:
npm install -g @nestjs/cli
nest new cats-app
cd cats-app
The CLI asks which package manager we prefer. We pick one and let it install dependencies. Now we start the development server:
npm run start:dev
Opening http://localhost:3000 shows Hello World!. Our first API is alive, and because we used start:dev, it reloads automatically whenever we save a file.
Next, we generate a whole feature in one command. This is the CLI at its best:
nest g resource cats
We choose REST API as the transport layer and answer Yes to generating CRUD entry points. The CLI creates:
CREATE src/cats/cats.controller.ts
CREATE src/cats/cats.module.ts
CREATE src/cats/cats.service.ts
CREATE src/cats/dto/create-cat.dto.ts
CREATE src/cats/dto/update-cat.dto.ts
CREATE src/cats/entities/cat.entity.ts
UPDATE src/app.module.ts
It also registered the new module in app.module.ts for us.
The scripts we will use most often live in package.json:
| Script | What it does |
|---|---|
npm run start:dev | Runs the app in watch mode |
npm run start:prod | Runs the compiled app from dist/ |
npm run build | Compiles TypeScript to JavaScript |
npm run test | Runs unit tests |
npm run test:e2e | Runs end-to-end tests |
npm run lint | Checks code style |
Quick recap
nest newcreates a project,nest g resourcecreates a feature.start:devgives us live reload.
Step 3: Understanding the project structure
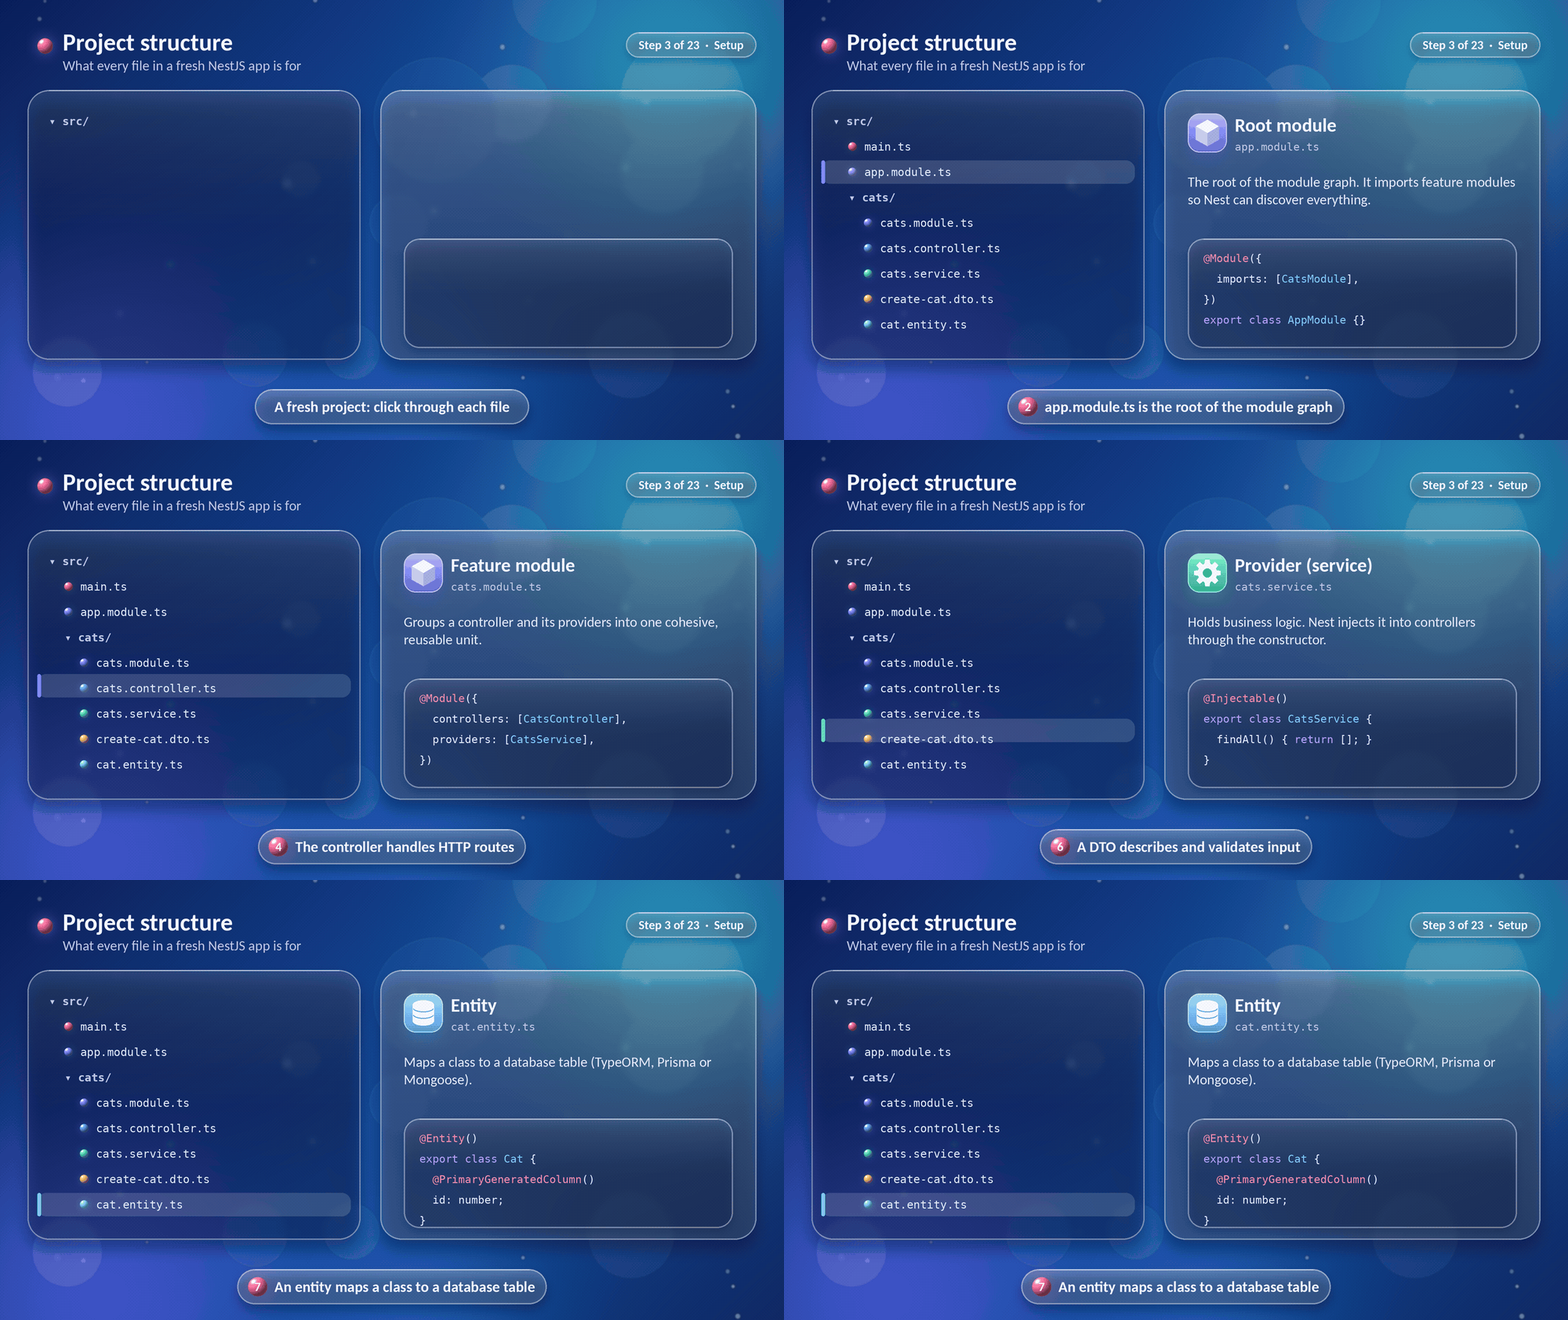
Before we write more code, we are going to learn what each file is for. After the previous step, our project looks like this:
cats-app/
├── src/
│   ├── main.ts
│   ├── app.module.ts
│   ├── app.controller.ts
│   ├── app.service.ts
│   └── cats/
│       ├── cats.module.ts
│       ├── cats.controller.ts
│       ├── cats.service.ts
│       ├── dto/
│       │   ├── create-cat.dto.ts
│       │   └── update-cat.dto.ts
│       └── entities/
│           └── cat.entity.ts
├── test/
│   └── app.e2e-spec.ts
├── nest-cli.json
├── tsconfig.json
└── package.json
Here is what each important file does:
| File | Role |
|---|---|
main.ts | The entry point. Creates the app and starts listening on a port. |
app.module.ts | The root module. It imports feature modules so Nest can find everything. |
cats.module.ts | A feature module that groups the cat controller and service. |
cats.controller.ts | Maps incoming HTTP requests to handler methods. |
cats.service.ts | Holds business logic. A provider that Nest can inject. |
create-cat.dto.ts | Describes the shape of incoming data. |
cat.entity.ts | Maps a class to a database table. |
The entry point is short enough to read in one breath:
// src/main.ts
import { NestFactory } from '@nestjs/core';
import { AppModule } from './app.module';

async function bootstrap() {
  const app = await NestFactory.create(AppModule);
  await app.listen(process.env.PORT ?? 3000);
}
bootstrap();
NestFactory.create(AppModule) builds the whole application starting from the root module. Everything else hangs off that one line.
Quick recap
main.tsboots the app,app.module.tsis the root of the module graph.- Each feature gets its own folder with a module, controller and service.
Step 4: The building blocks at a glance
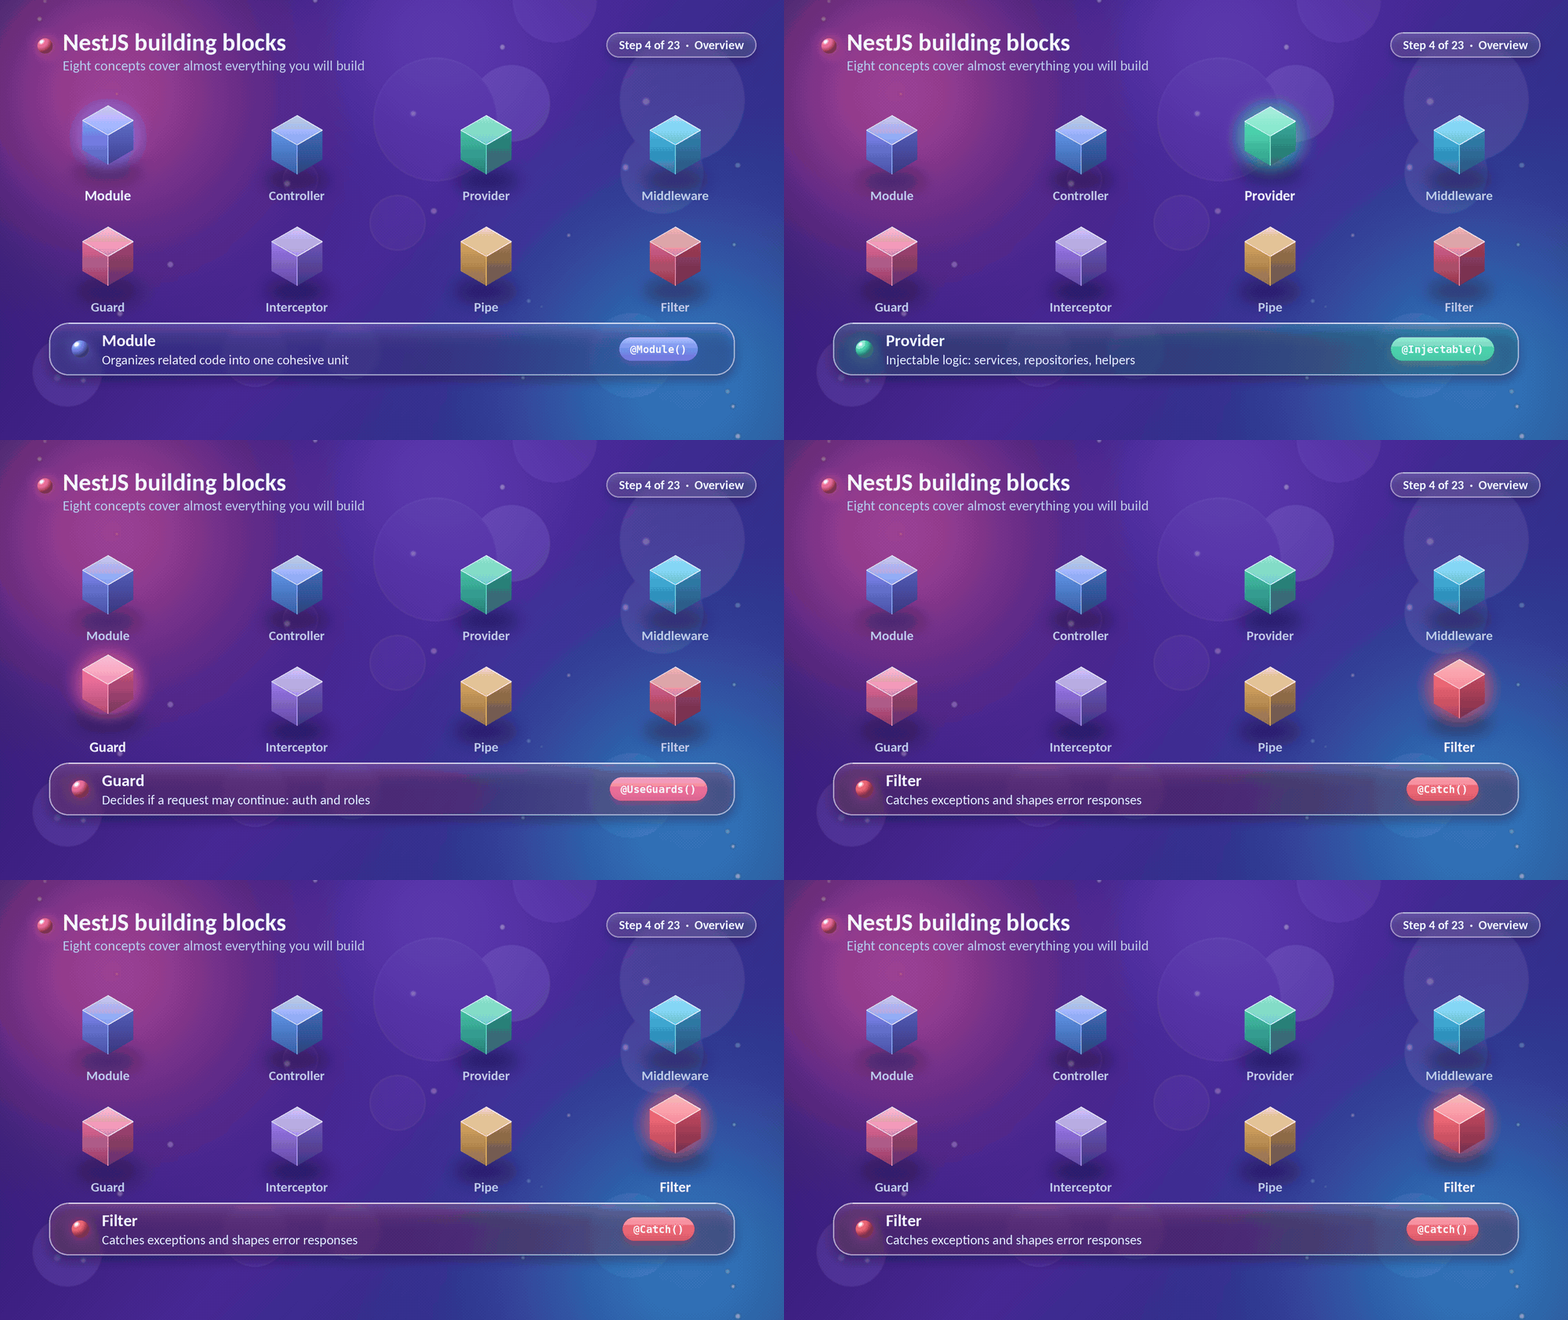
NestJS has a lot of vocabulary, but eight ideas cover almost everything we are going to build. We meet them here once, and then we add each one to our system in its own step.
| Block | Its job | You will recognize it by |
|---|---|---|
| Module | Organizes related code into one cohesive unit | @Module() |
| Controller | Receives requests and returns responses | @Controller() |
| Provider | Injectable logic such as services and repositories | @Injectable() |
| Middleware | Runs before the route handler: logging, CORS | NestMiddleware |
| Guard | Decides if a request may continue: auth and roles | @UseGuards() |
| Interceptor | Wraps handlers to map, time or cache responses | @UseInterceptors() |
| Pipe | Validates and transforms incoming data | @UsePipes() |
| Filter | Catches exceptions and shapes error responses | @Catch() |
A helpful way to remember them: modules organize, controllers route, providers work, and the remaining four (middleware, guards, interceptors, pipes) plus filters form the pipeline that every request travels through.
Quick recap
- Eight blocks, one job each.
- We are going to add them one at a time, in the order a request meets them.
Part 2: Core concepts
Step 5: Modules, organizing our code
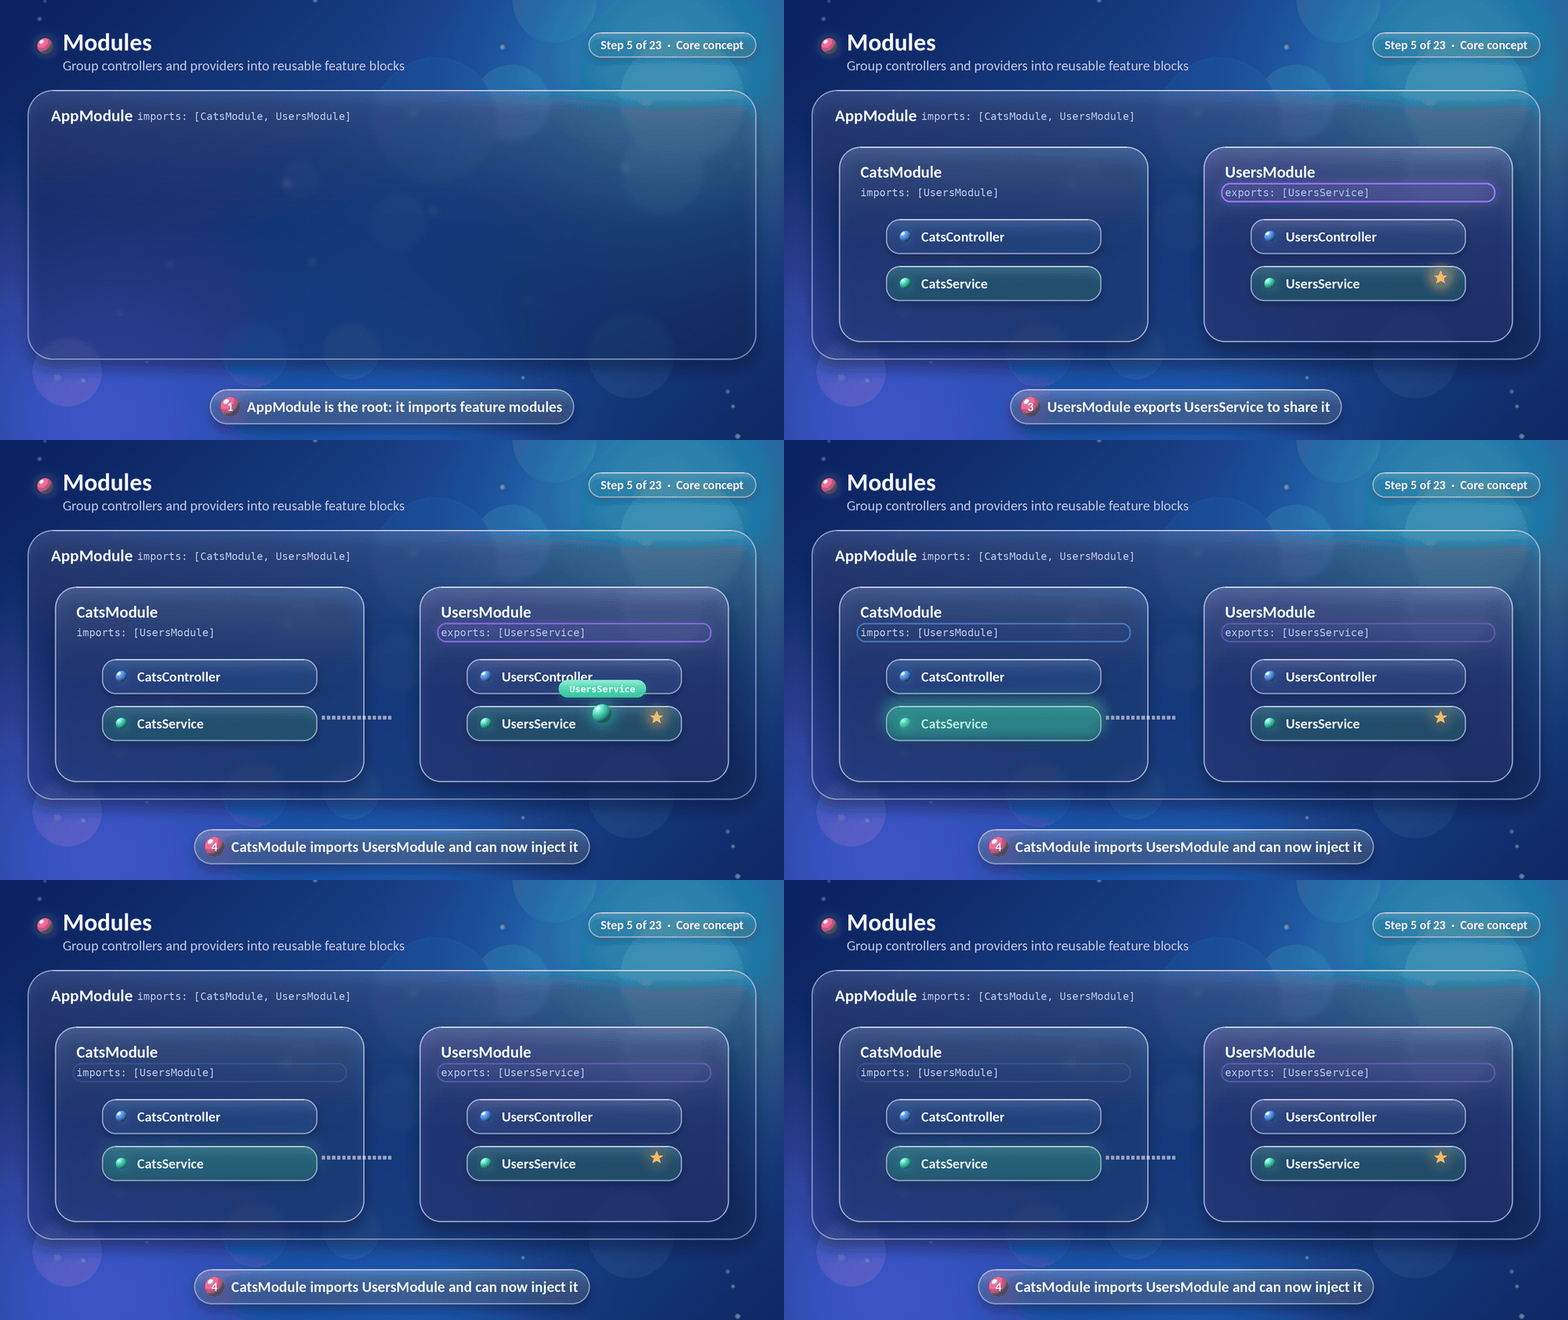
A module is a class decorated with @Module(). It tells Nest which controllers and providers belong together. Every app has at least one module, the root.
The generator already created our feature module:
// src/cats/cats.module.ts
import { Module } from '@nestjs/common';
import { CatsController } from './cats.controller';
import { CatsService } from './cats.service';

@Module({
  controllers: [CatsController],
  providers: [CatsService],
  exports: [CatsService],
})
export class CatsModule {}
The four properties of @Module() are worth memorizing:
| Property | Meaning |
|---|---|
controllers | Controllers that belong to this module |
providers | Services and other injectables created by this module |
imports | Other modules whose exported providers we want to use |
exports | The subset of our providers that other modules may use |
The root module then imports our feature module:
// src/app.module.ts
@Module({
  imports: [CatsModule],
  controllers: [AppController],
  providers: [AppService],
})
export class AppModule {}
Here is the part that surprises many newcomers. Providers are private to their module by default. If another module needs CatsService, two things must happen: CatsModule must export it, and the other module must import CatsModule.
We are going to use exactly this pattern later when authentication needs the users service:
@Module({
  providers: [UsersService],
  exports: [UsersService],      // 1. UsersModule shares it
})
export class UsersModule {}

@Module({
  imports: [UsersModule],       // 2. AuthModule asks for it
  providers: [AuthService],
})
export class AuthModule {}
A small tip: when a module such as configuration is needed everywhere, we can mark it @Global() or pass isGlobal: true, and we will do that in Step 13.
Quick recap
- Modules group controllers and providers.
- To share a provider:
exportson one side,importson the other.
Step 6: Controllers and routing
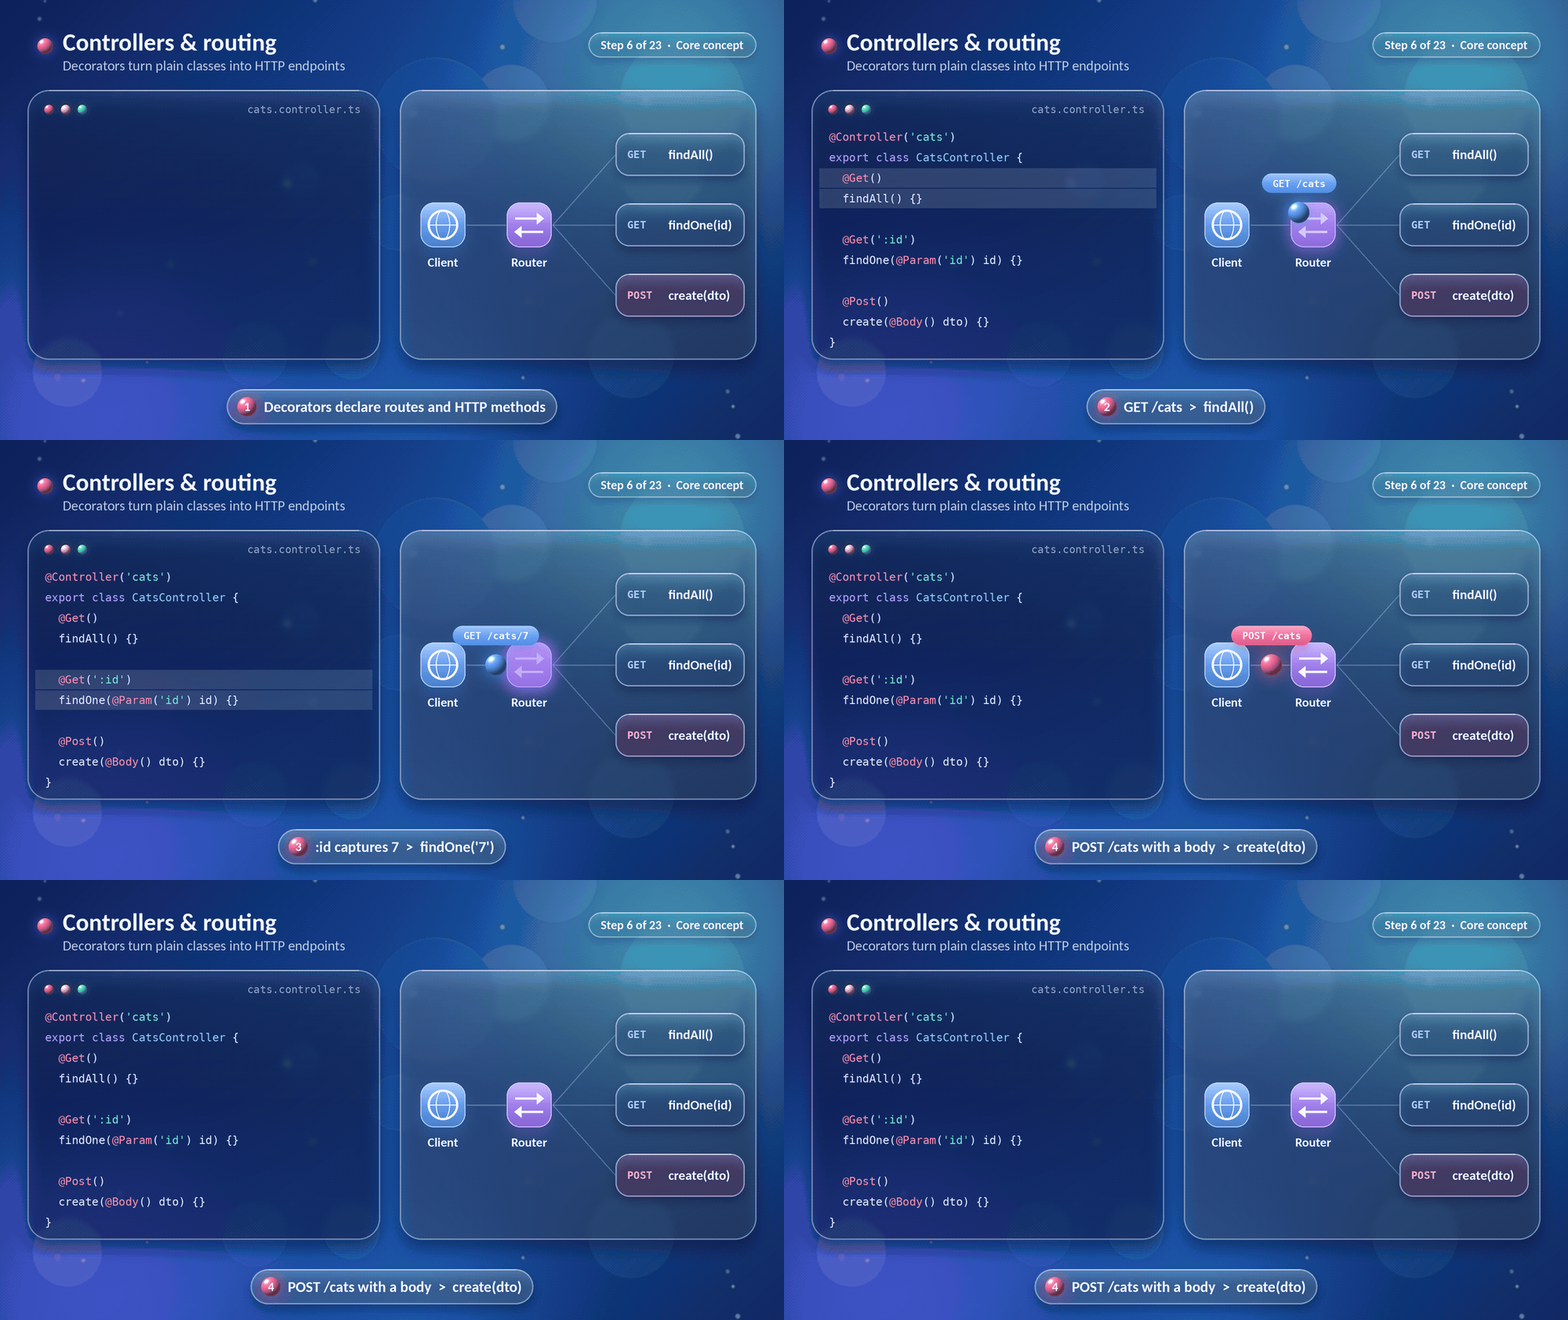
Controllers receive requests and send back responses. We are going to declare routes with decorators, and Nest builds the routing table for us.
// src/cats/cats.controller.ts
import { Body, Controller, Delete, Get, Param, Post } from '@nestjs/common';

@Controller('cats')
export class CatsController {
  @Get()
  findAll() {
    return 'This action returns all cats';
  }

  @Get(':id')
  findOne(@Param('id') id: string) {
    return `This action returns cat #${id}`;
  }

  @Post()
  create(@Body() body: unknown) {
    return 'This action adds a new cat';
  }

  @Delete(':id')
  remove(@Param('id') id: string) {
    return `This action removes cat #${id}`;
  }
}
The prefix in @Controller('cats') combines with each method decorator:
| Request | Handler |
|---|---|
GET /cats | findAll() |
GET /cats/7 | findOne('7') |
POST /cats | create(body) |
DELETE /cats/7 | remove('7') |
A few facts that save us debugging time:
- Whatever the method returns becomes the response body. Objects are sent as JSON automatically.
- The default status is
200, exceptPOST, which defaults to201. We can change it with@HttpCode(204). - Routes are matched in declaration order. A fixed path such as
@Get('featured')must be declared before@Get(':id'), otherwise:idswallows it.
Quick recap
@Controller('cats')sets a prefix,@Get()/@Post()set the method and path.- The return value is the response.
Step 7: Request decorators
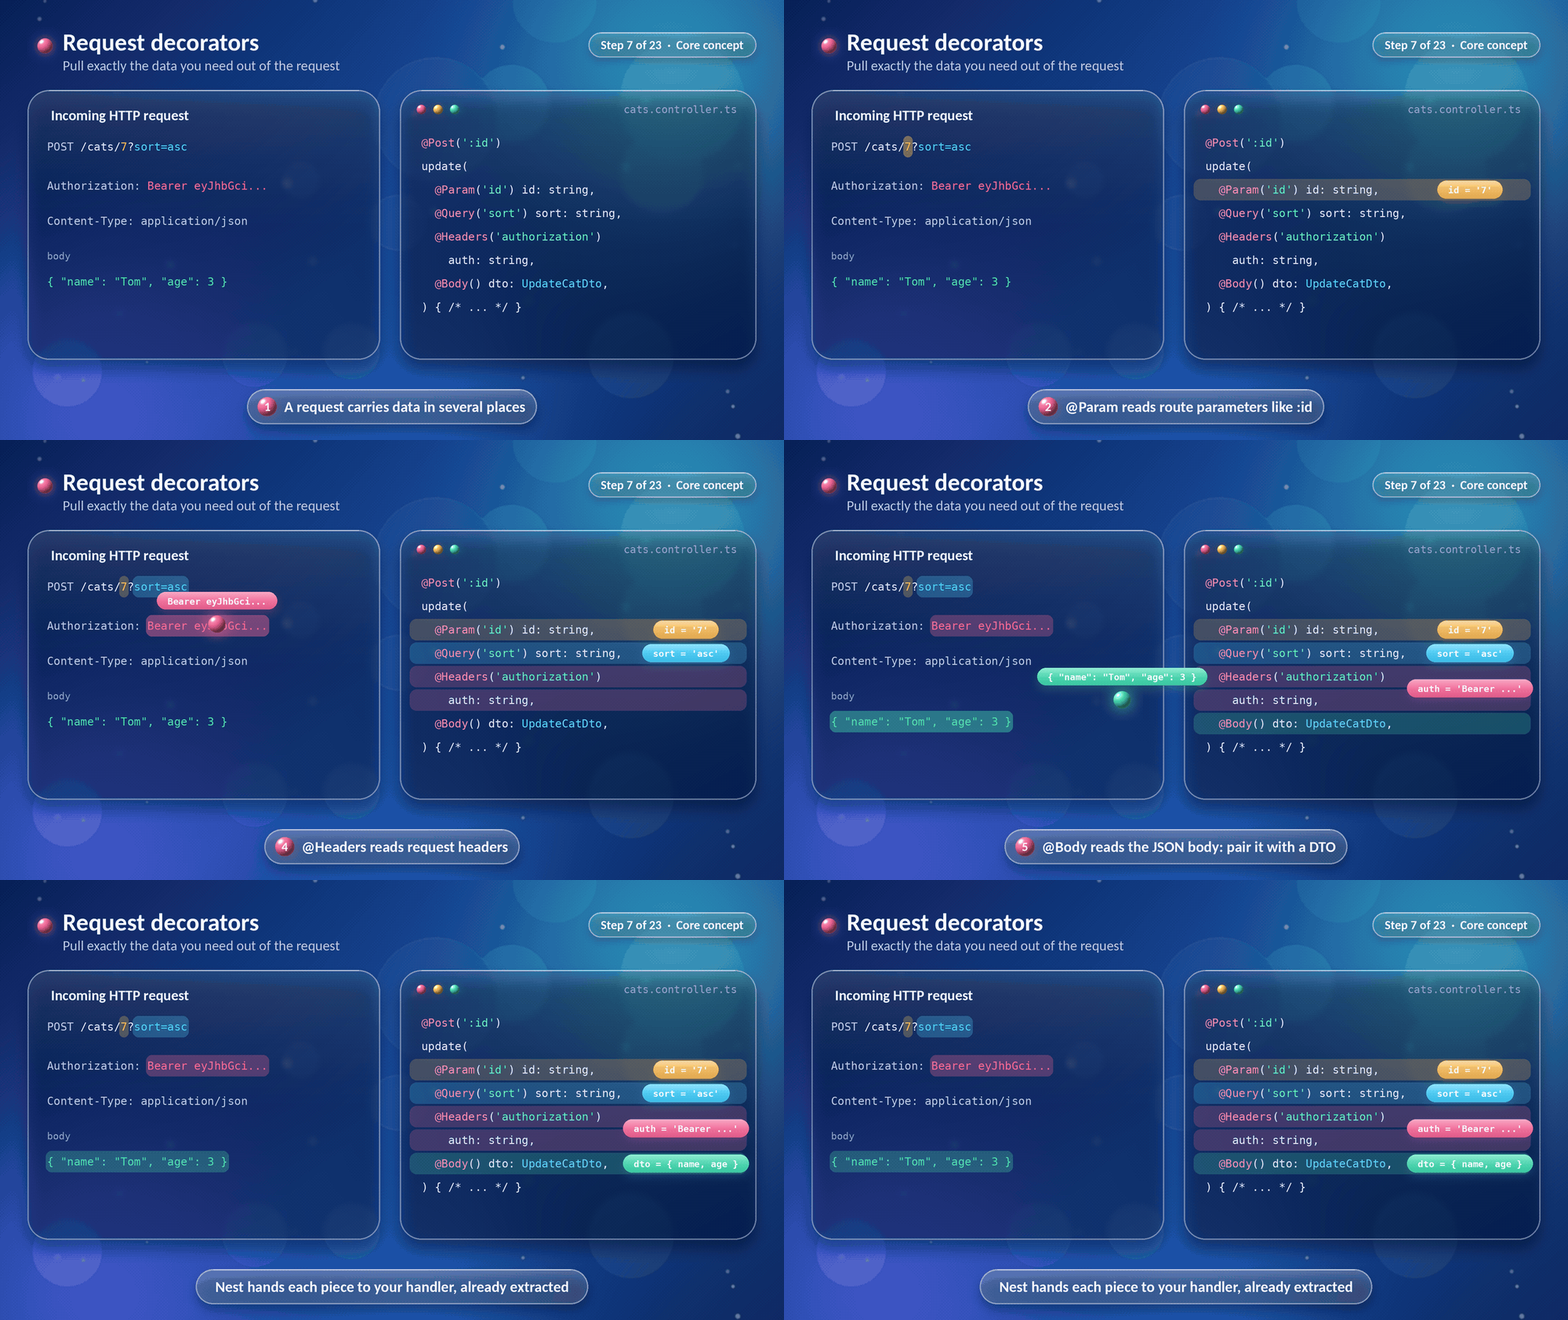
A request carries data in several places. Instead of digging through a raw request object, we are going to ask Nest for exactly what we need with parameter decorators.
import { Body, Headers, Param, Post, Query } from '@nestjs/common';

// A demo endpoint to show every decorator in one place.
@Post(':id')
update(
  @Param('id') id: string,
  @Query('sort') sort: string,
  @Headers('authorization') auth: string,
  @Body() dto: UpdateCatDto,
) {
  return { id, sort, hasToken: !!auth, dto };
}
For a request like this:
POST /cats/7?sort=asc
Authorization: Bearer eyJhbGci...
Content-Type: application/json

{ "name": "Tom", "age": 3 }
Nest hands our method the following:
| Decorator | Reads | Value in our example |
|---|---|---|
@Param('id') | A route parameter | '7' |
@Query('sort') | The query string | 'asc' |
@Headers('authorization') | A request header | 'Bearer eyJhbGci...' |
@Body() | The JSON body | { name: 'Tom', age: 3 } |
Notice that id arrives as a string, even though it looks like a number. That is not a bug, it is how HTTP works, and in Step 10 we are going to solve it with a pipe.
We can also grab the whole request with @Req(), but we avoid it when possible. The specific decorators keep our handlers short, readable and independent of Express.
Quick recap
@Param,@Query,@Headersand@Bodyextract exactly what a handler needs.- Route parameters and query-string values arrive as strings. JSON request bodies can contain strings, numbers, booleans, arrays, and objects.
Step 8: Providers and services
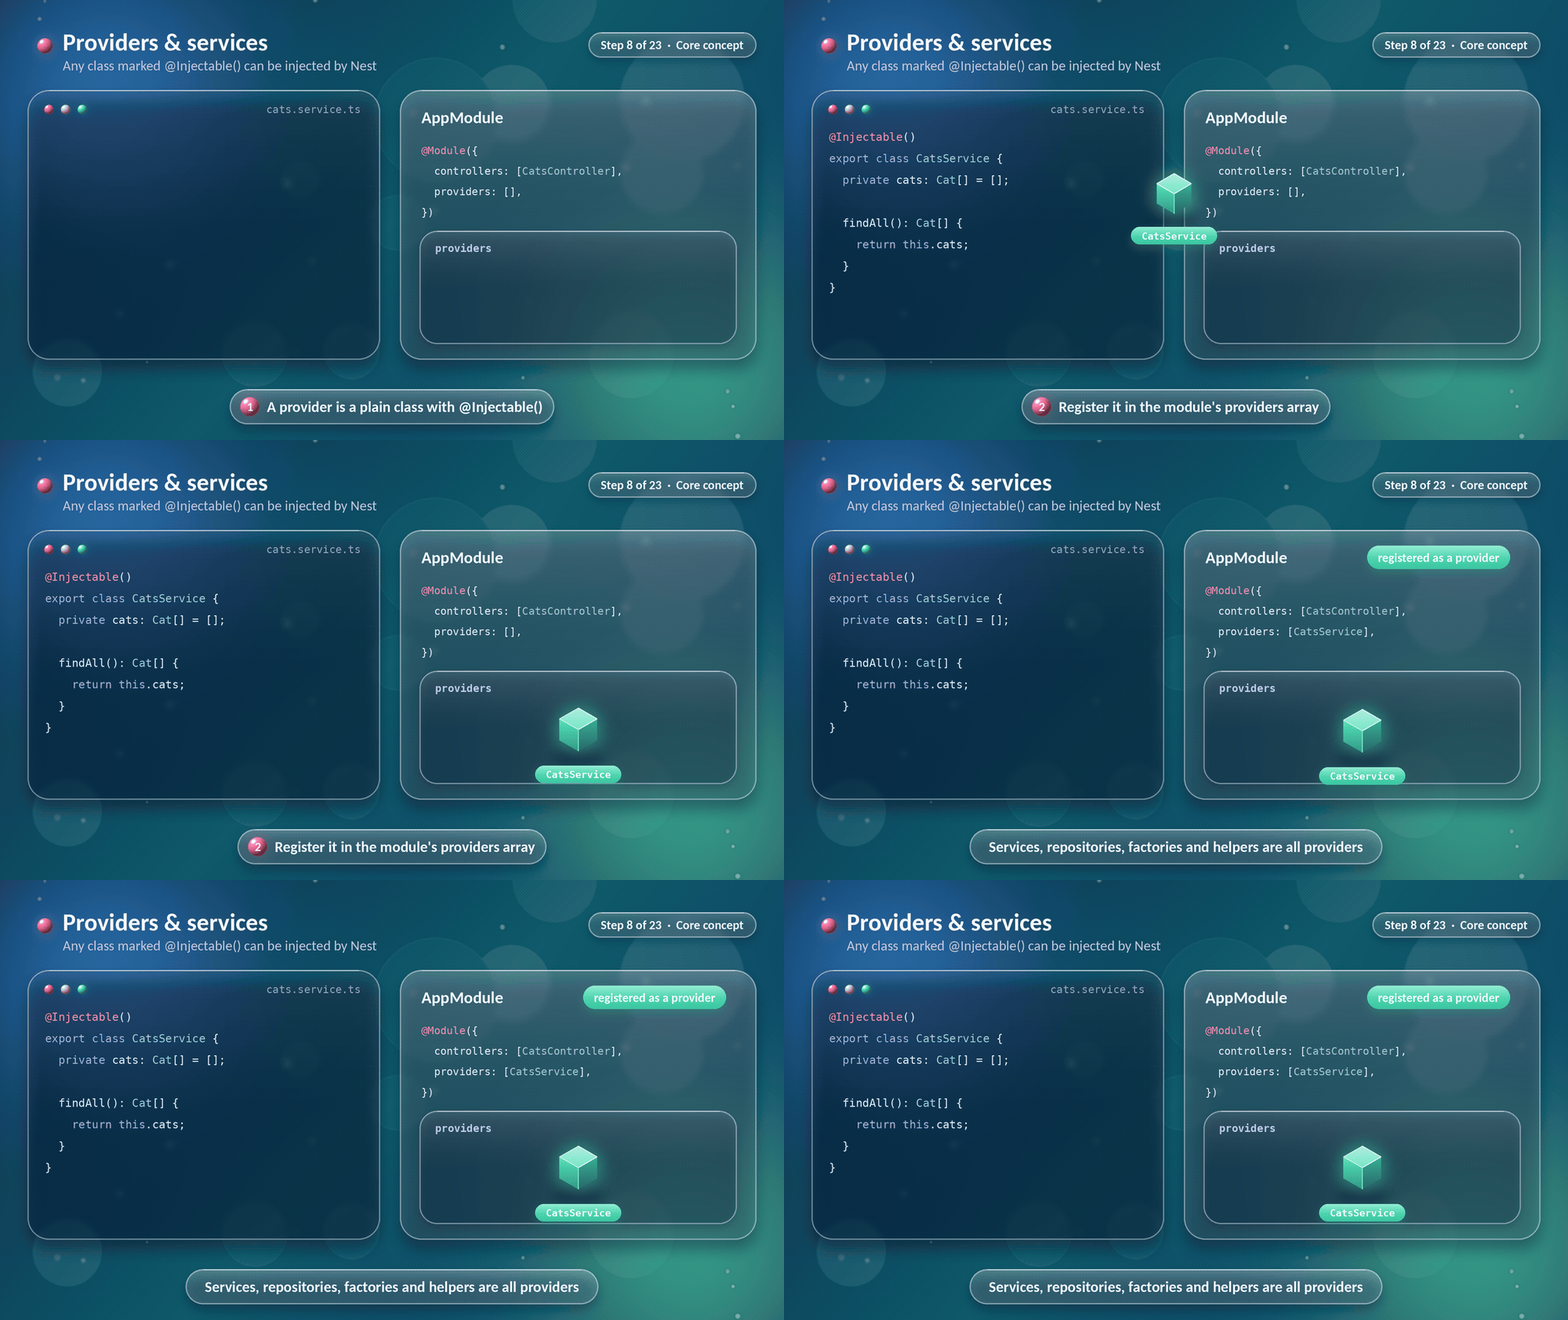
Controllers should stay thin. They receive a request, call something, and return the result. The real work belongs in providers, and the most common provider is a service.
A provider is any class marked with @Injectable(). That decorator tells Nest: "this class can be created and handed to others". We start with an in-memory version of our service so we can focus on the idea:
// src/cats/cats.service.ts
import { Injectable, NotFoundException } from '@nestjs/common';

export interface Cat {
  id: number;
  name: string;
  age: number;
}

@Injectable()
export class CatsService {
  private cats: Cat[] = [];
  private nextId = 1;

  findAll(): Cat[] {
    return this.cats;
  }

  findOne(id: number): Cat {
    const cat = this.cats.find((c) => c.id === id);
    if (!cat) throw new NotFoundException(`Cat #${id} not found`);
    return cat;
  }

  create(data: Omit<Cat, 'id'>): Cat {
    const cat = { id: this.nextId++, ...data };
    this.cats.push(cat);
    return cat;
  }

  remove(id: number): void {
    this.cats = this.cats.filter((c) => c.id !== id);
  }
}
Writing the class is only half the job. We also register it in the module's providers array, so Nest knows it exists:
@Module({
  controllers: [CatsController],
  providers: [CatsService],   // registered here
})
export class CatsModule {}
After registration, Nest can create the service once and share it wherever it is requested.
Services are not the only providers. Repositories, factories, helpers and even plain configuration values are providers too. The rule is simple: if Nest should create it and inject it, it is a provider.
Quick recap
@Injectable()plus an entry inprovidersmakes a class injectable.- Business logic lives in services, not controllers.
Step 9: Dependency injection
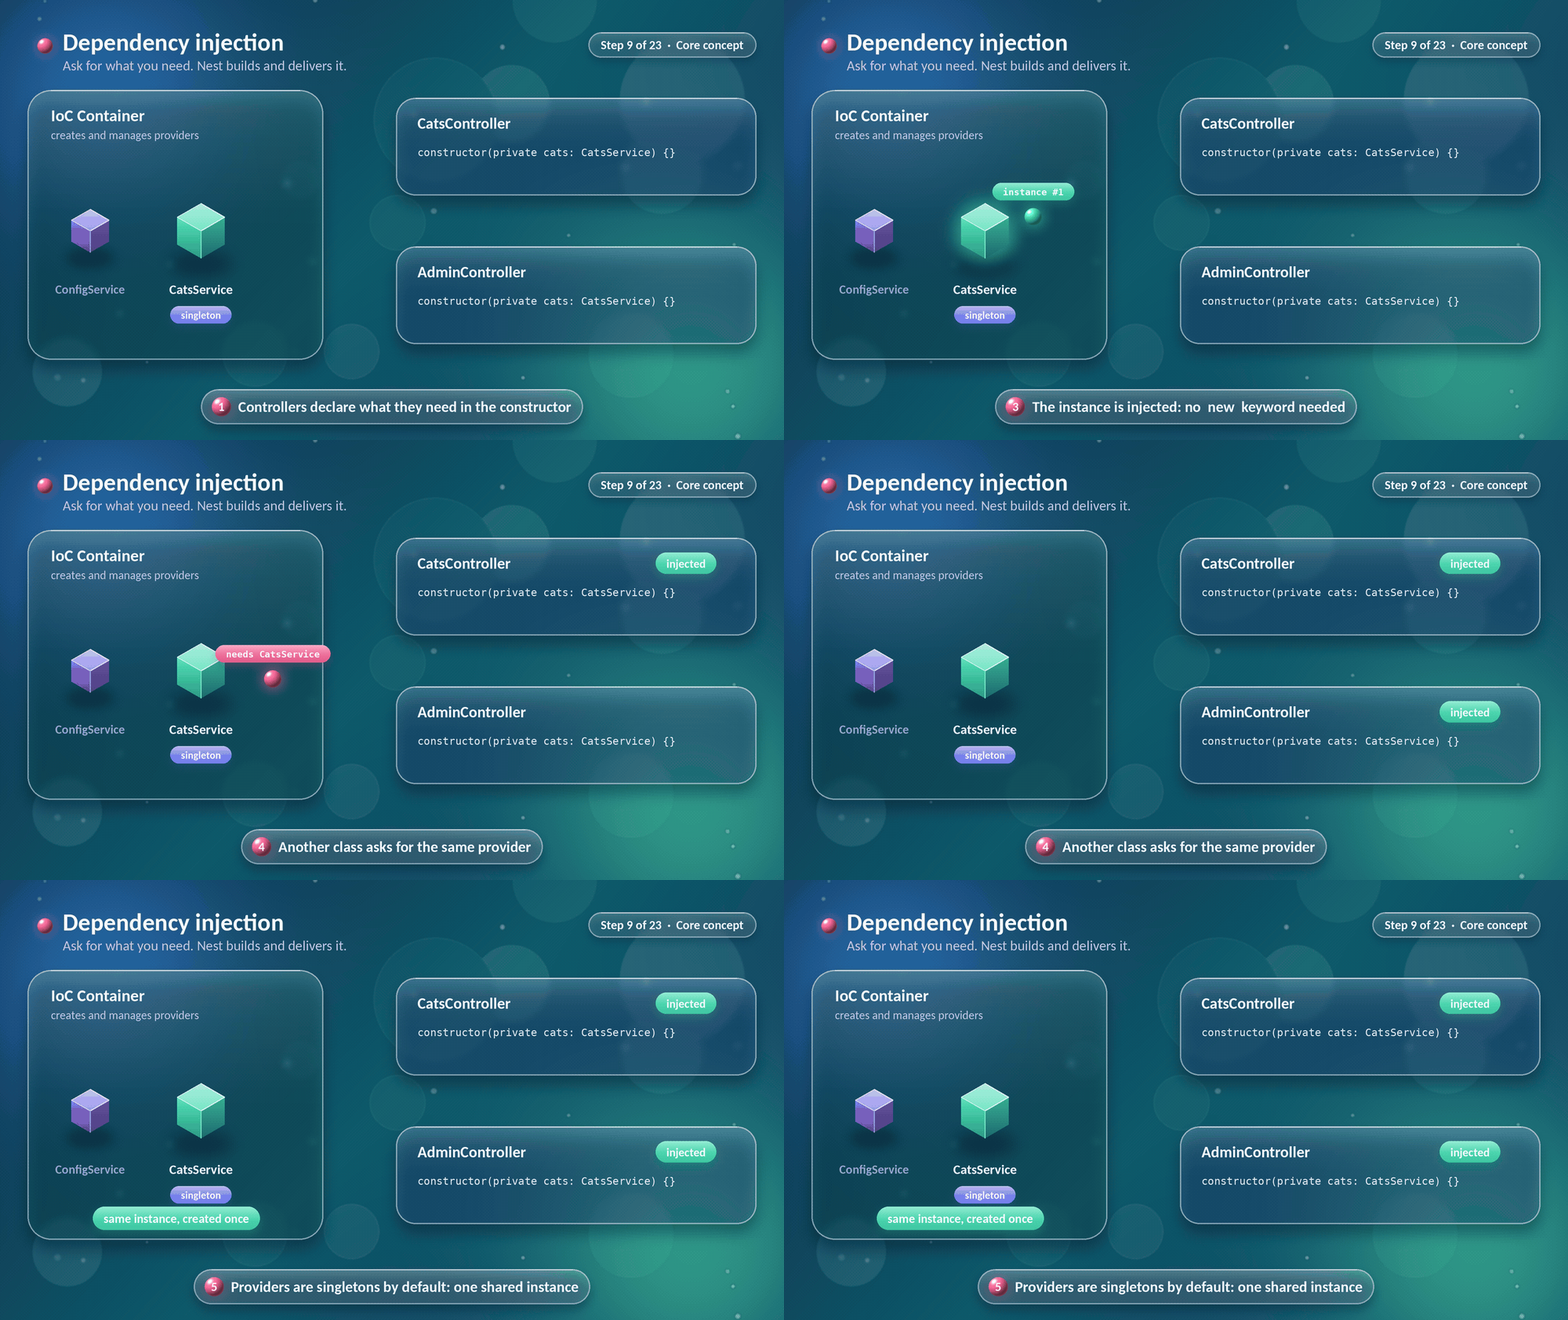
Now we connect the controller to the service, and this is where NestJS shows its character. We never write new CatsService(). We ask for what we need in the constructor, and Nest delivers it.
@Controller('cats')
export class CatsController {
  constructor(private readonly catsService: CatsService) {}

  @Get()
  findAll() {
    return this.catsService.findAll();
  }

  @Get(':id')
  findOne(@Param('id') id: string) {
    return this.catsService.findOne(Number(id)); // Prefer ParseIntPipe in a real route.
  }
}
Here is what happens behind the scenes, step by step, exactly as the animation shows:
- At startup, Nest builds an IoC container (Inversion of Control) holding every registered provider.
- It reads the constructor of
CatsControllerand sees that aCatsServiceis required. - It looks the provider up in the container, creates it if needed, and passes it in.
- If another class asks for
CatsService, it receives the same instance.
That last point matters. By default, providers are singletons within their module/application context: one shared instance is reused rather than created for every request. That is efficient, but it also means mutable state in a singleton service (like our in-memory array) is shared across requests. Do not use an in-memory array as production persistence.
Why is this better than creating objects by hand?
- We change a dependency in one place, not in every file that uses it.
- Tests can swap a real service for a mock without touching the controller.
- Nest knows the dependency graph, so it can create things in the right order.
Custom providers
The shorthand providers: [CatsService] is equivalent to this class-provider declaration:
{ provide: CatsService, useClass: CatsService }
Writing it out lets us do more. We can provide plain values, or build a provider with a factory:
providers: [
  CatsService,
  { provide: 'APP_NAME', useValue: 'Cats API' },
  {
    provide: 'PAGE_SIZE',
    useFactory: (config: ConfigService) => config.get<number>('pageSize'),
    inject: [ConfigService],
  },
],
Values registered under a string token are requested with @Inject():
constructor(@Inject('APP_NAME') private readonly appName: string) {}
A note on scopes
The default scope is the singleton. Nest can also create a provider per request (Scope.REQUEST) or per consumer (Scope.TRANSIENT). We reach for those only when a provider truly needs per-request state, because they cost performance.
Quick recap
- We declare dependencies in the constructor, and Nest injects them.
- Providers are singletons by default.
useClass,useValueanduseFactorygive us full control when needed.
Part 3: Data and input
Step 10: Pipes
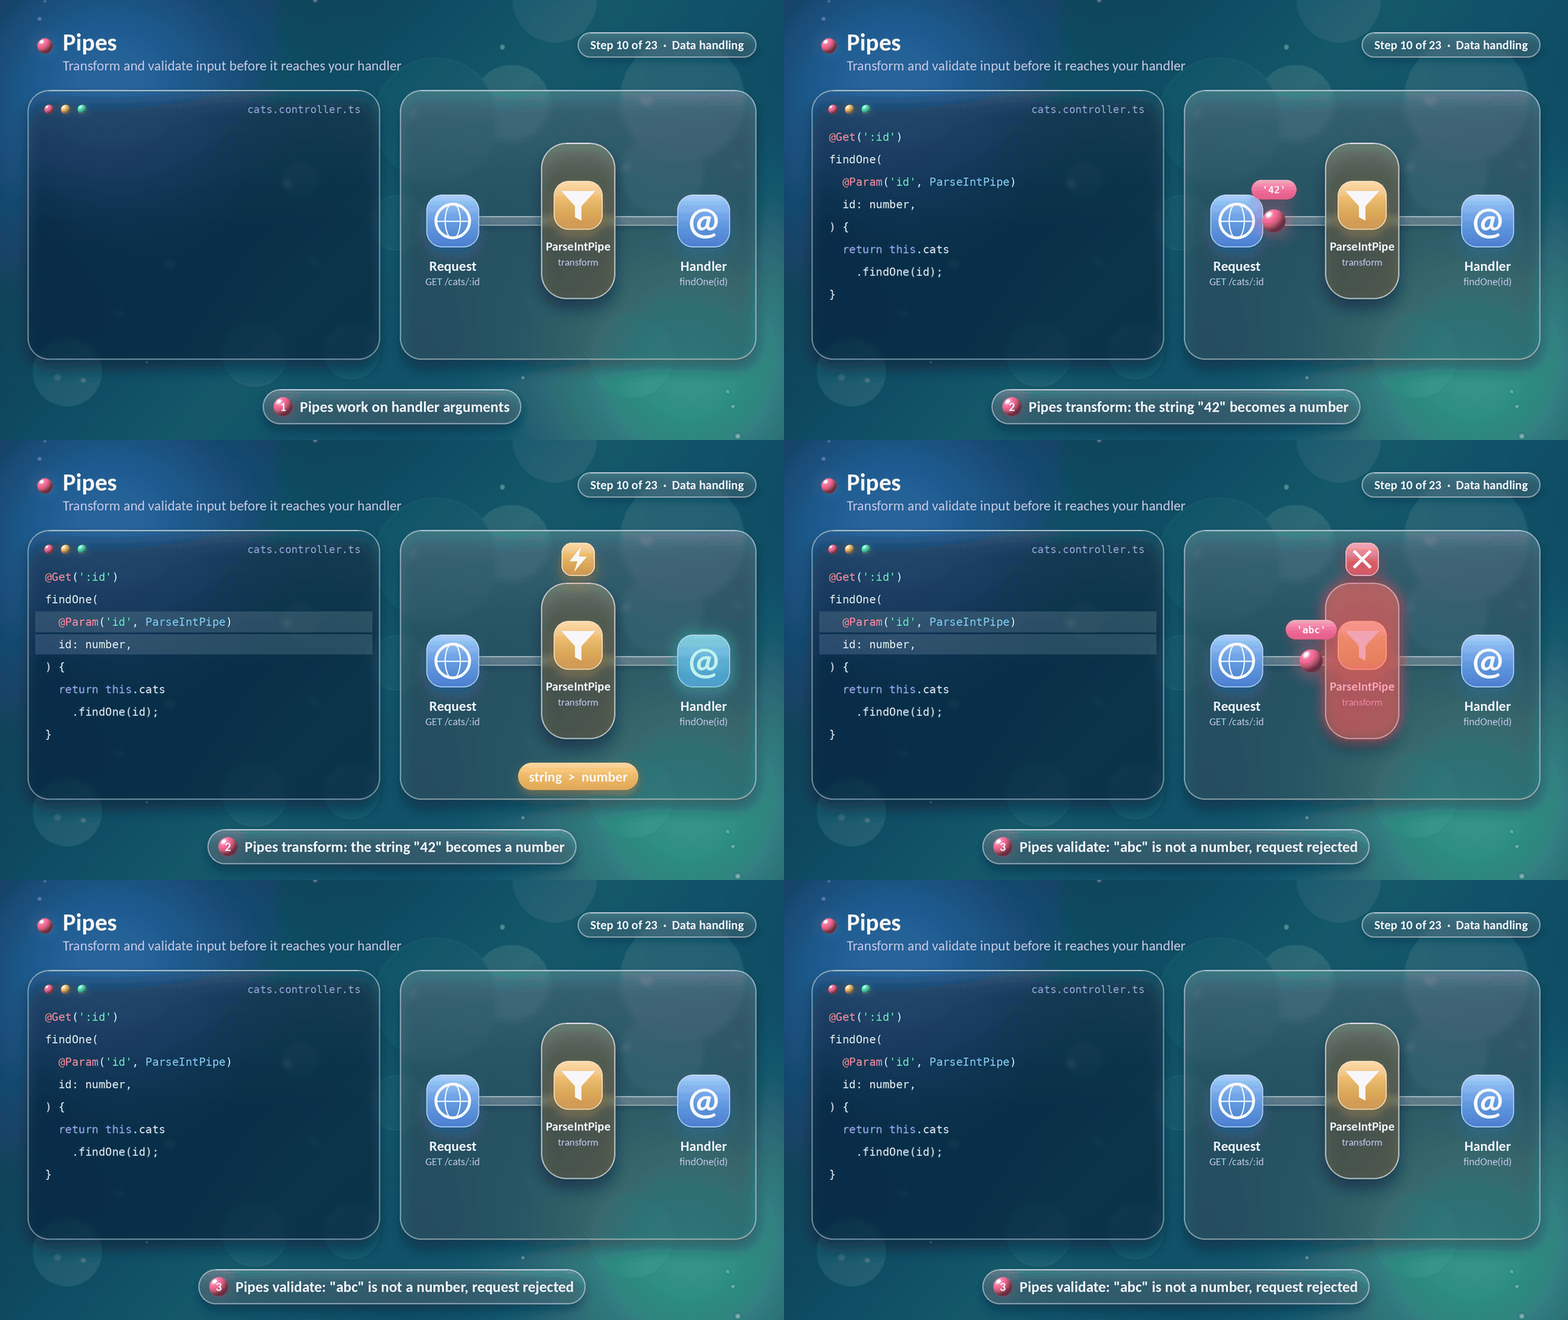
Remember the problem from Step 7? Route parameters arrive as strings, but our service expects a number. We are going to fix it with a pipe.
A pipe runs just before the handler and does one of two jobs:
- Transformation: convert input into the form we want.
- Validation: check the input and throw if it is wrong.
import { ParseIntPipe } from '@nestjs/common';

@Get(':id')
findOne(@Param('id', ParseIntPipe) id: number) {
  return this.catsService.findOne(id);
}
Now GET /cats/42 gives our handler the number 42. And GET /cats/abc never reaches our handler. Nest answers with a clear error:
{
  "message": "Validation failed (numeric string is expected)",
  "error": "Bad Request",
  "statusCode": 400
}
Nest ships with several ready-made pipes:
| Pipe | What it does |
|---|---|
ParseIntPipe | String to integer |
ParseFloatPipe | String to float |
ParseBoolPipe | 'true' / 'false' to boolean |
ParseUUIDPipe | Checks that a value is a UUID |
ParseEnumPipe | Checks that a value belongs to an enum |
ParseArrayPipe | Parses and validates arrays |
DefaultValuePipe | Supplies a default when a value is missing |
ValidationPipe | Validates whole objects (our next step) |
When none of them fits, writing our own is easy:
import { ArgumentMetadata, Injectable, PipeTransform } from '@nestjs/common';

@Injectable()
export class TrimPipe implements PipeTransform<string, string> {
  transform(value: string, metadata: ArgumentMetadata) {
    return typeof value === 'string' ? value.trim() : value;
  }
}
Pipes can be applied to a single parameter (as above), to a whole route, to a controller, or globally.
Quick recap
- Pipes transform and validate input right before the handler.
- A failed pipe returns
400 Bad Requestautomatically.
Step 11: DTOs and validation
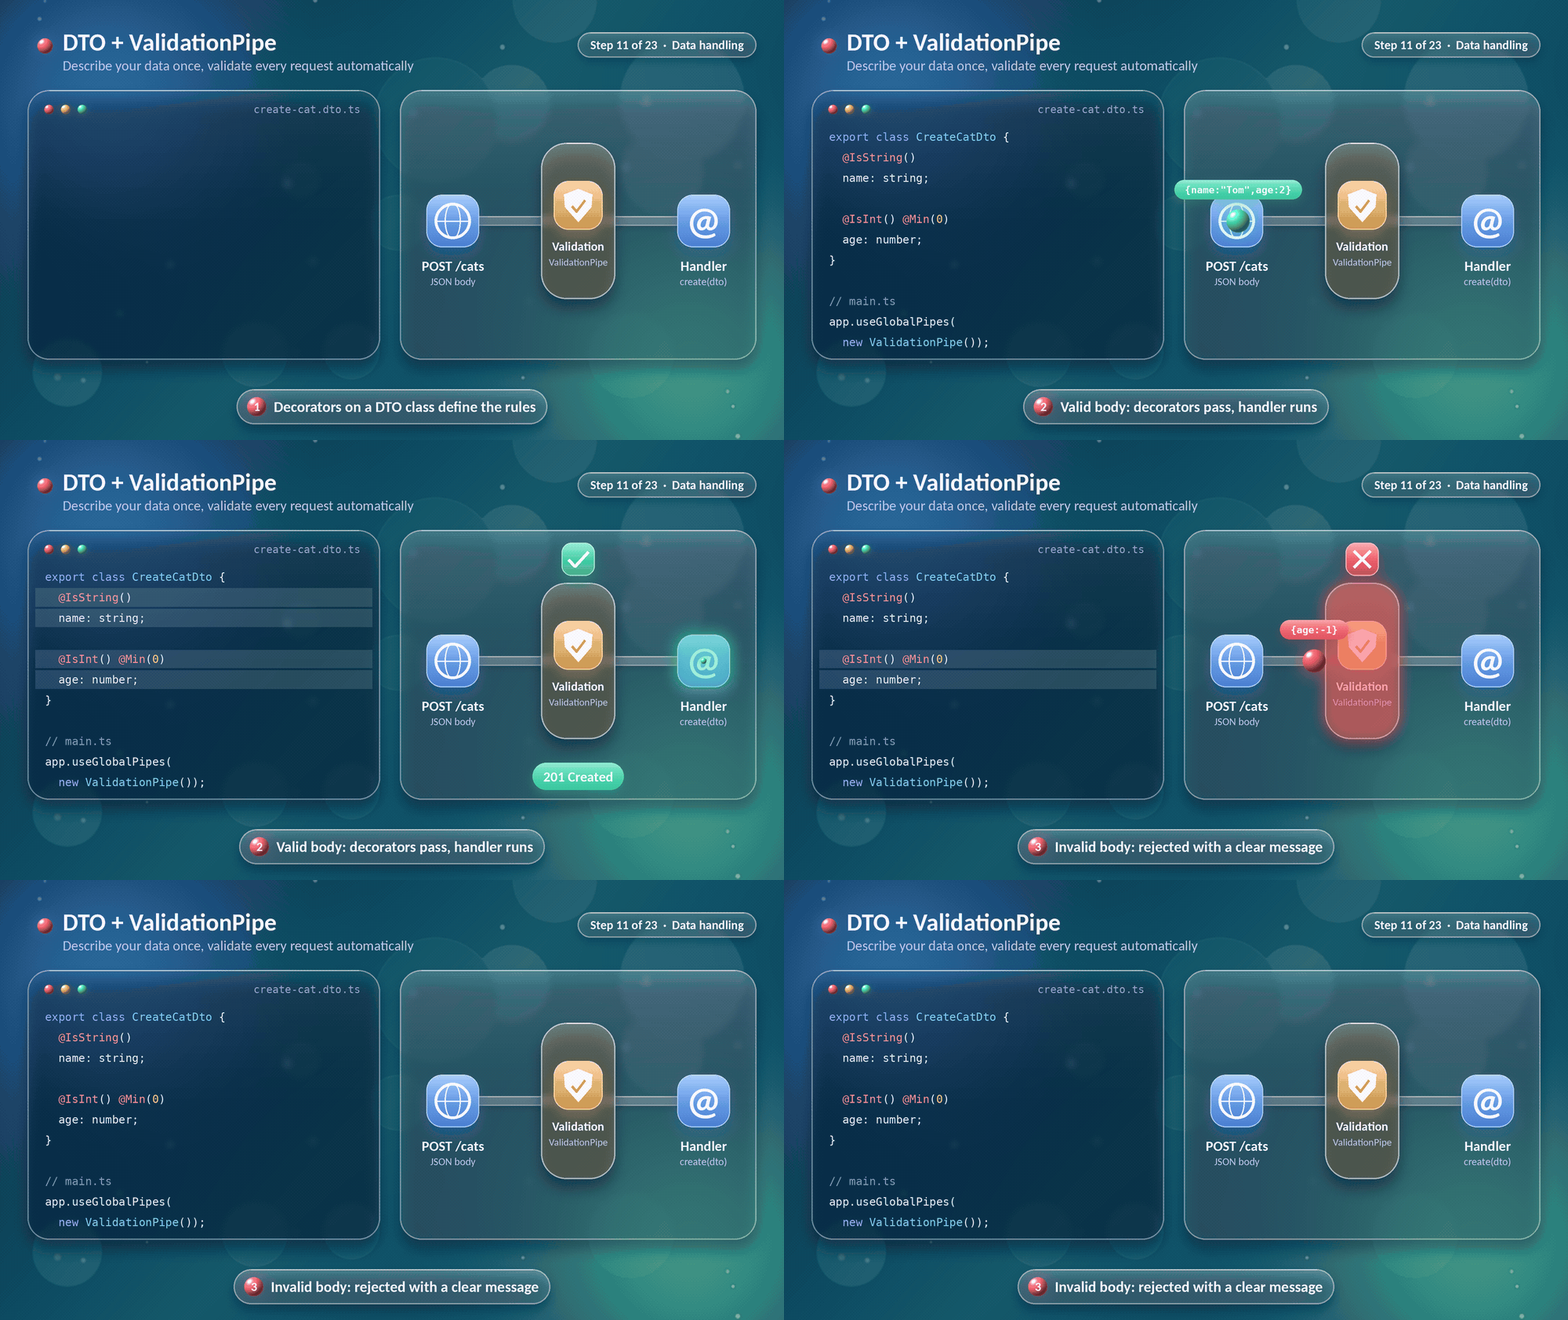
Validating one parameter is useful. Validating a whole request body is essential. We are going to describe our data once, in a class called a DTO (Data Transfer Object), and let Nest enforce it everywhere.
First we install the libraries behind ValidationPipe:
npm install class-validator class-transformer @nestjs/mapped-types
Now we write the DTO. Each decorator is a rule:
// src/cats/dto/create-cat.dto.ts
import { IsInt, IsOptional, IsString, Min, MaxLength } from 'class-validator';

export class CreateCatDto {
  @IsString()
  @MaxLength(50)
  name: string;

  @IsInt()
  @Min(0)
  age: number;

  @IsOptional()
  @IsString()
  breed?: string;
}
For updates, every field becomes optional. We do not want to copy the rules, so we derive the class:
// src/cats/dto/update-cat.dto.ts
import { PartialType } from '@nestjs/mapped-types';
import { CreateCatDto } from './create-cat.dto';

export class UpdateCatDto extends PartialType(CreateCatDto) {}
Then we switch validation on for the whole application in main.ts:
import { ValidationPipe } from '@nestjs/common';

app.useGlobalPipes(
  new ValidationPipe({
    whitelist: true,            // remove properties that are not in the DTO
    forbidNonWhitelisted: true, // reject the request if unknown properties are present
    transform: true,            // turn plain JSON into DTO instances
  }),
);
Finally, the controller uses the DTO as the type of the body:
@Post()
create(@Body() createCatDto: CreateCatDto) {
  return this.catsService.create(createCatDto);
}
A valid body such as { "name": "Tom", "age": 2 } passes straight through. An invalid one, such as { "age": -1 }, never reaches the service. Nest replies with a precise list of what went wrong:
{
  "message": [
    "name must be a string",
    "age must not be less than 0"
  ],
  "error": "Bad Request",
  "statusCode": 400
}
The whitelist option deserves a moment. Without it, extra fields such as "role": "admin" may reach application code if they are not otherwise handled. With whitelist: true, properties without validation decorators are removed; with forbidNonWhitelisted: true, the request is rejected instead. This helps reduce mass-assignment risks, but authorization must still be enforced in the service layer.
Quick recap
- DTO classes plus
class-validatordecorators define the rules once. ValidationPipeenforces them globally, andwhitelistblocks unexpected fields.
Step 12: Database with TypeORM
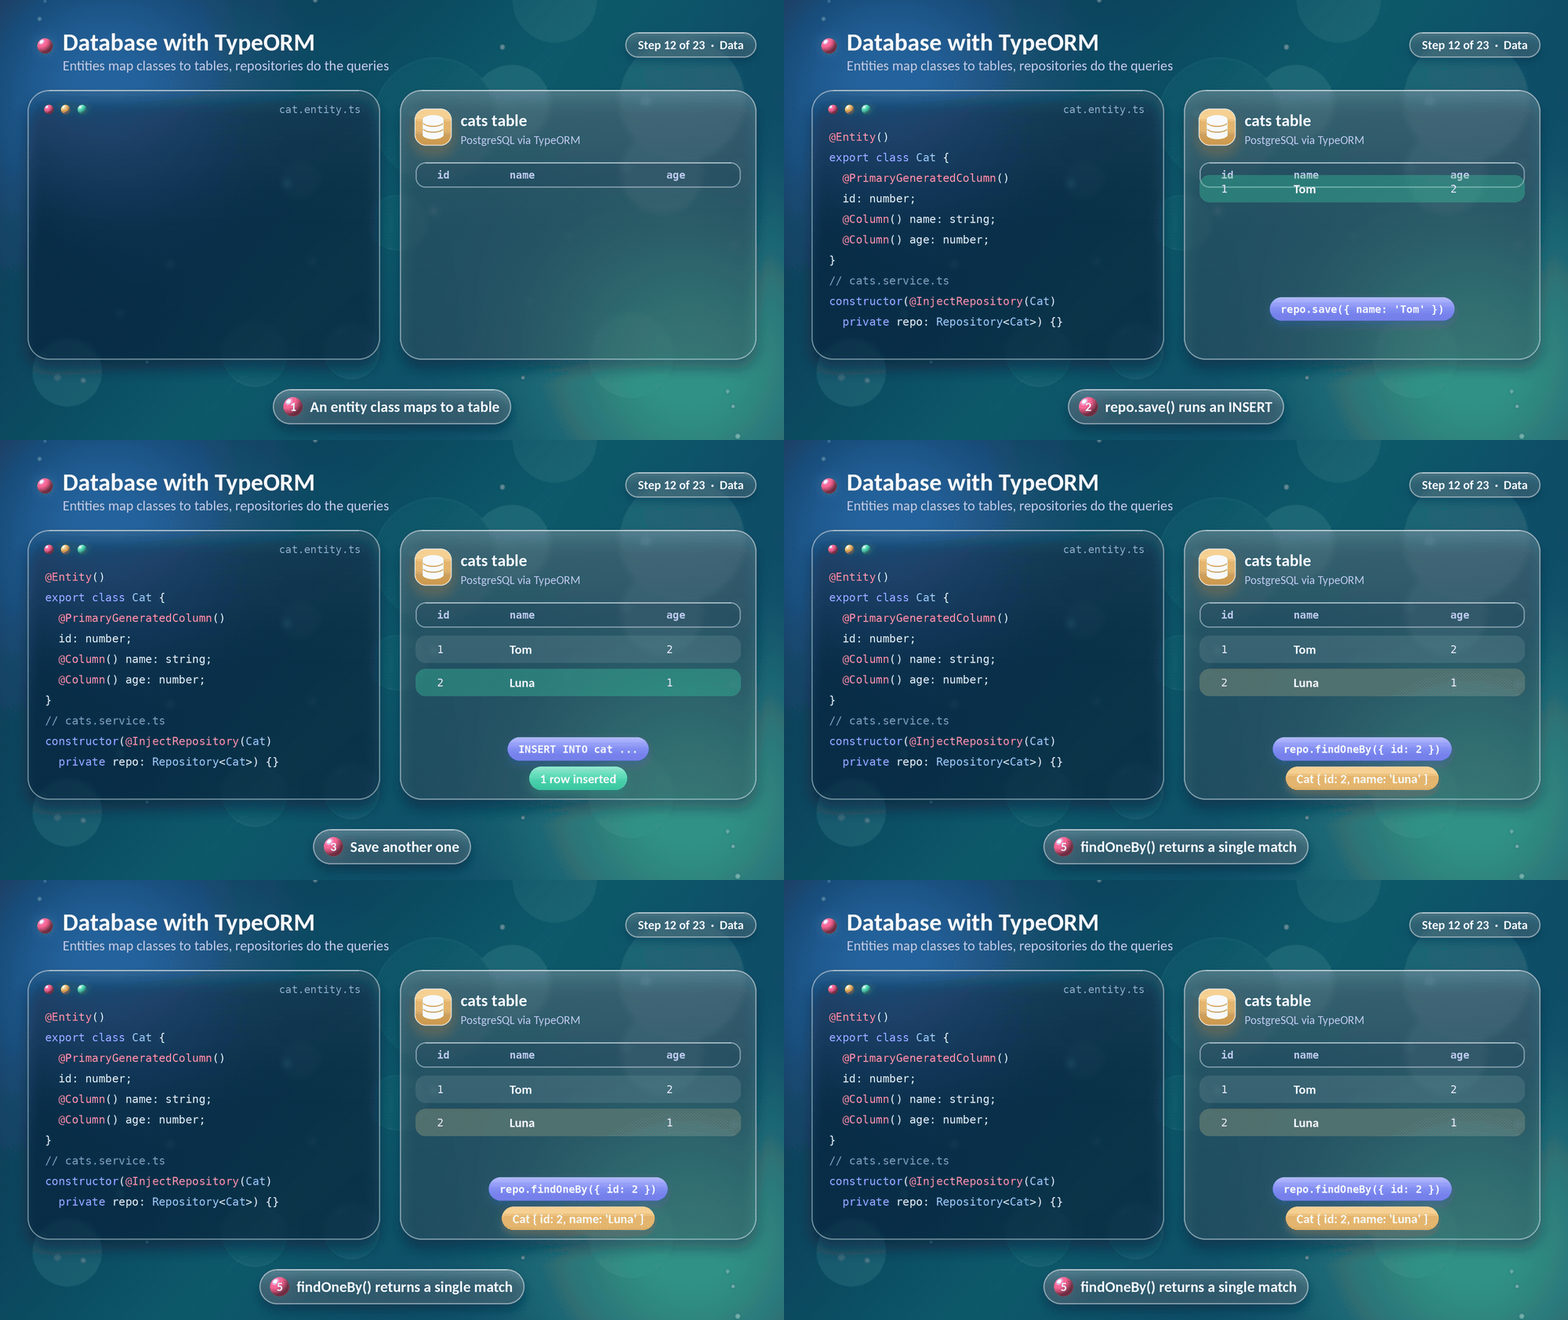
Our in-memory array forgets everything when the server restarts. We are going to add a real database. We use PostgreSQL with TypeORM here, but Nest works just as well with Prisma, Mongoose, MikroORM or Drizzle.
We start a local PostgreSQL with Docker and install the packages:
docker run --name cats-db \
  -e POSTGRES_PASSWORD=postgres \
  -e POSTGRES_DB=cats \
  -p 5432:5432 -d postgres:17

npm install @nestjs/typeorm typeorm pg
The entity
An entity is a class that maps to a table:
// src/cats/entities/cat.entity.ts
import { Column, Entity, PrimaryGeneratedColumn } from 'typeorm';

@Entity()
export class Cat {
  @PrimaryGeneratedColumn()
  id: number;

  @Column()
  name: string;

  @Column()
  age: number;

  @Column({ nullable: true })
  breed?: string;
}
Connecting the database
We configure the connection once in the root module. For now, the values are written directly. In the next step we are going to move them to environment variables.
// src/app.module.ts
import { TypeOrmModule } from '@nestjs/typeorm';

@Module({
  imports: [
    TypeOrmModule.forRoot({
      type: 'postgres',
      host: 'localhost',
      port: 5432,
      username: 'postgres',
      password: 'postgres',
      database: 'cats',
      autoLoadEntities: true,
      synchronize: true, // development only!
    }),
    CatsModule,
  ],
})
export class AppModule {}
Careful:
synchronize: truerebuilds tables to match our entities, which is handy while learning and dangerous in production. For real deployments we use migrations.
Registering the entity in its feature module
// src/cats/cats.module.ts
@Module({
  imports: [TypeOrmModule.forFeature([Cat])],
  controllers: [CatsController],
  providers: [CatsService],
})
export class CatsModule {}
The service uses a repository
Look how little changes. The array becomes a repository, and the repository is injected like any other provider:
// src/cats/cats.service.ts
@Injectable()
export class CatsService {
  constructor(
    @InjectRepository(Cat)
    private readonly catsRepository: Repository<Cat>,
  ) {}

  findAll() {
    return this.catsRepository.find();
  }

  async findOne(id: number) {
    const cat = await this.catsRepository.findOneBy({ id });
    if (!cat) throw new NotFoundException(`Cat #${id} not found`);
    return cat;
  }

  create(dto: CreateCatDto) {
    const cat = this.catsRepository.create(dto);
    return this.catsRepository.save(cat);
  }

  async update(id: number, dto: UpdateCatDto) {
    const cat = await this.findOne(id);
    Object.assign(cat, dto);
    return this.catsRepository.save(cat);
  }

  async remove(id: number) {
    const cat = await this.findOne(id);
    await this.catsRepository.remove(cat);
  }
}
The controller does not change at all, apart from awaiting promises, which Nest does for us. That is the payoff of keeping controllers thin: we swapped the whole storage layer without touching the HTTP layer.
Quick recap
- Entities map classes to tables, repositories run queries.
forRootconnects,forFeatureregisters entities for a module.synchronizeis for development, migrations are for production.
Step 13: Configuration and environment variables
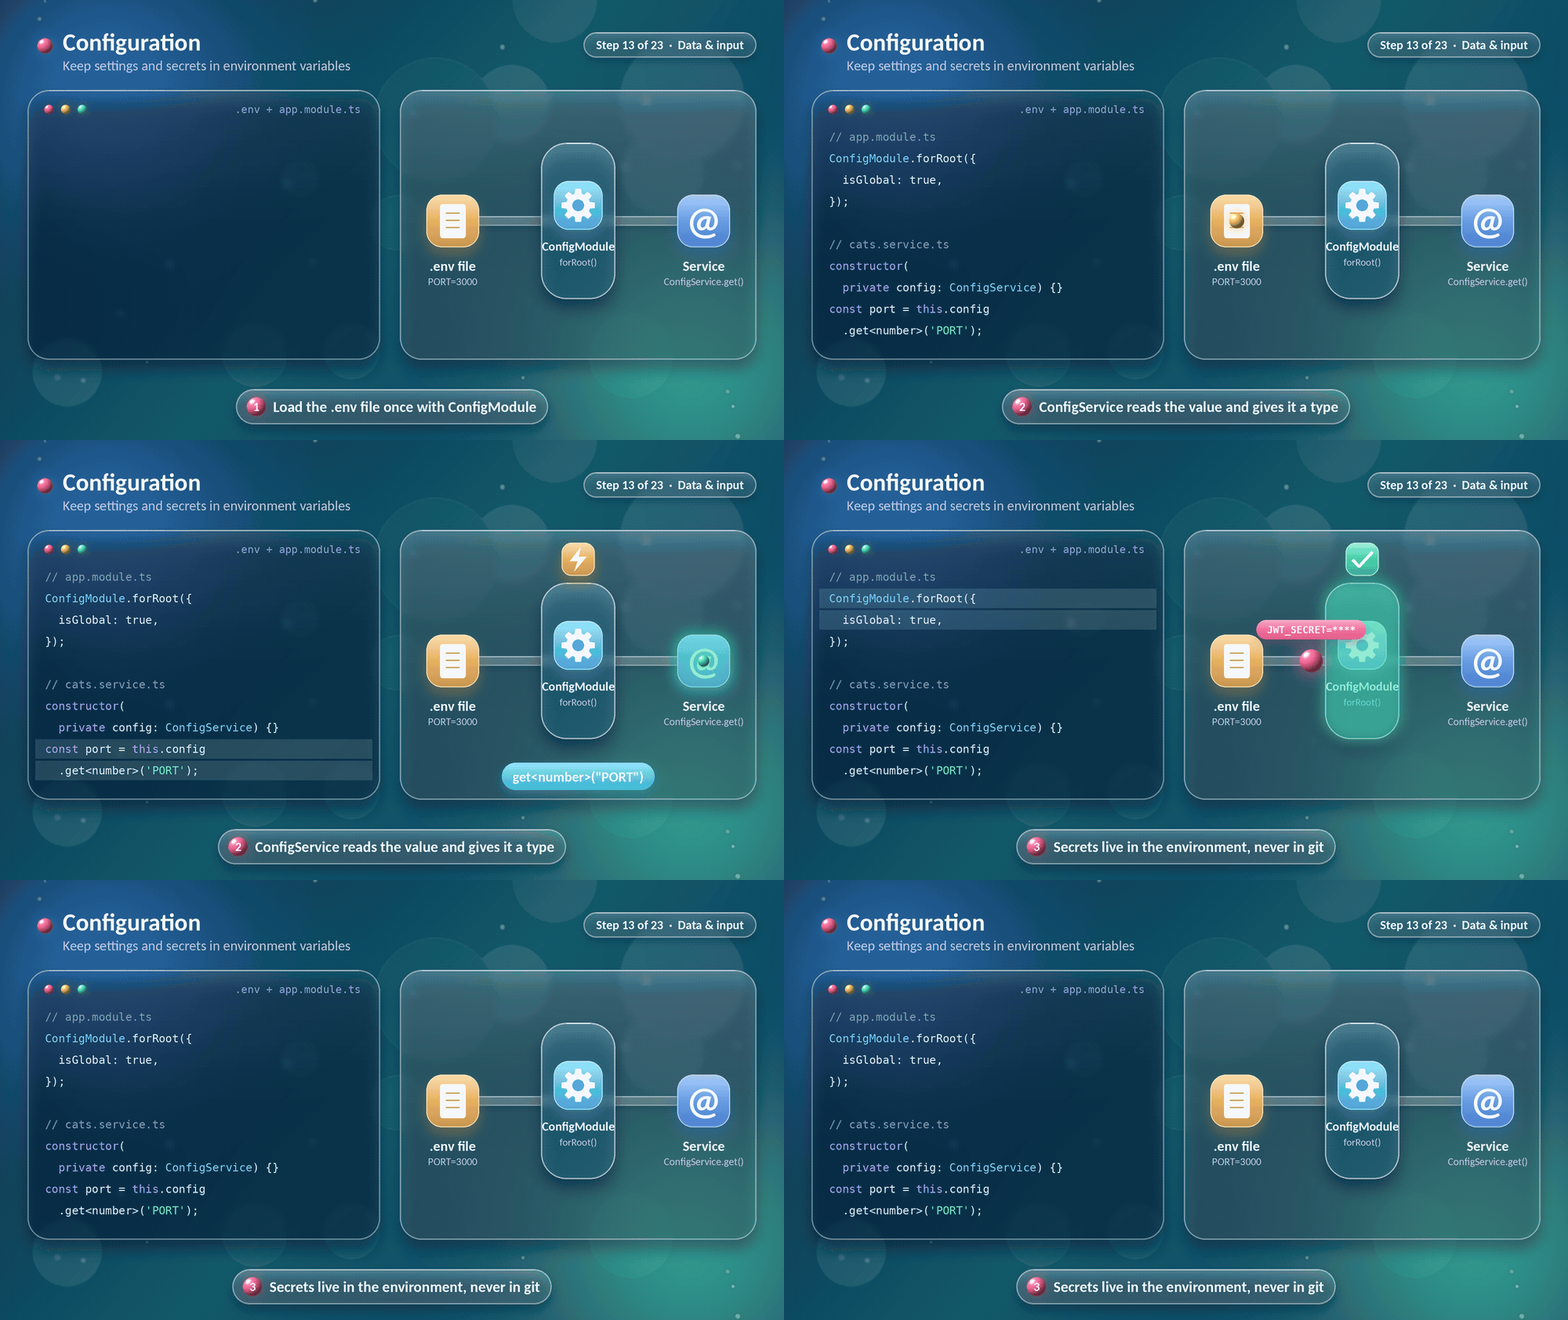
Right now our database password sits in the source code. We are going to move every setting and secret into environment variables, and read them through Nest's configuration module.
npm install @nestjs/config
We create a .env file in the project root:
PORT=3000
NODE_ENV=development

DB_HOST=localhost
DB_PORT=5432
DB_USER=postgres
DB_PASSWORD=postgres
DB_NAME=cats

JWT_SECRET=change-me-to-a-long-random-string
Two housekeeping rules come immediately. We add .env to .gitignore, so secrets never reach the repository, and we commit a .env.example with fake values so teammates know which variables exist.
A typed configuration file
Environment variables are always strings. Nest does not convert them for us, so we do the parsing once, in one place:
// src/config/configuration.ts
export default () => ({
  port: parseInt(process.env.PORT ?? '3000', 10),
  nodeEnv: process.env.NODE_ENV ?? 'development',
  database: {
    host: process.env.DB_HOST,
    port: parseInt(process.env.DB_PORT ?? '5432', 10),
    user: process.env.DB_USER,
    password: process.env.DB_PASSWORD,
    name: process.env.DB_NAME,
  },
  jwt: {
    secret: process.env.JWT_SECRET,
  },
});
Loading it globally
// src/app.module.ts
@Module({
  imports: [
    ConfigModule.forRoot({ isGlobal: true, load: [configuration] }),
    TypeOrmModule.forRootAsync({
      inject: [ConfigService],
      useFactory: (config: ConfigService) => ({
        type: 'postgres',
        host: config.get<string>('database.host'),
        port: config.get<number>('database.port'),
        username: config.get<string>('database.user'),
        password: config.get<string>('database.password'),
        database: config.get<string>('database.name'),
        autoLoadEntities: true,
        synchronize: config.get<string>('nodeEnv') === 'development',
      }),
    }),
    CatsModule,
  ],
})
export class AppModule {}
forRootAsync is the pattern to remember: it waits for ConfigService to be ready, then builds the database options from it.
Any service can now ask for configuration through dependency injection:
constructor(private readonly config: ConfigService) {}

const port = this.config.get<number>('port');
And main.ts can listen on the configured port:
const config = app.get(ConfigService);
await app.listen(config.get<number>('port') ?? 3000);
Note:
get<number>()only tells TypeScript what type to expect. The actual conversion is theparseIntwe wrote in the configuration file. For stricter checks, configure startup validation with@nestjs/config(for example, a Joi schema or a custom validation function) so the app refuses to boot when required values are missing or invalid. Also keepsynchronizedisabled outside local development and use migrations for schema changes.
Quick recap
- Settings and secrets live in the environment, never in git.
ConfigModuleloads them,ConfigServicereads them,forRootAsyncconnects them to other modules.
Part 4: The request pipeline
Step 14: Middleware
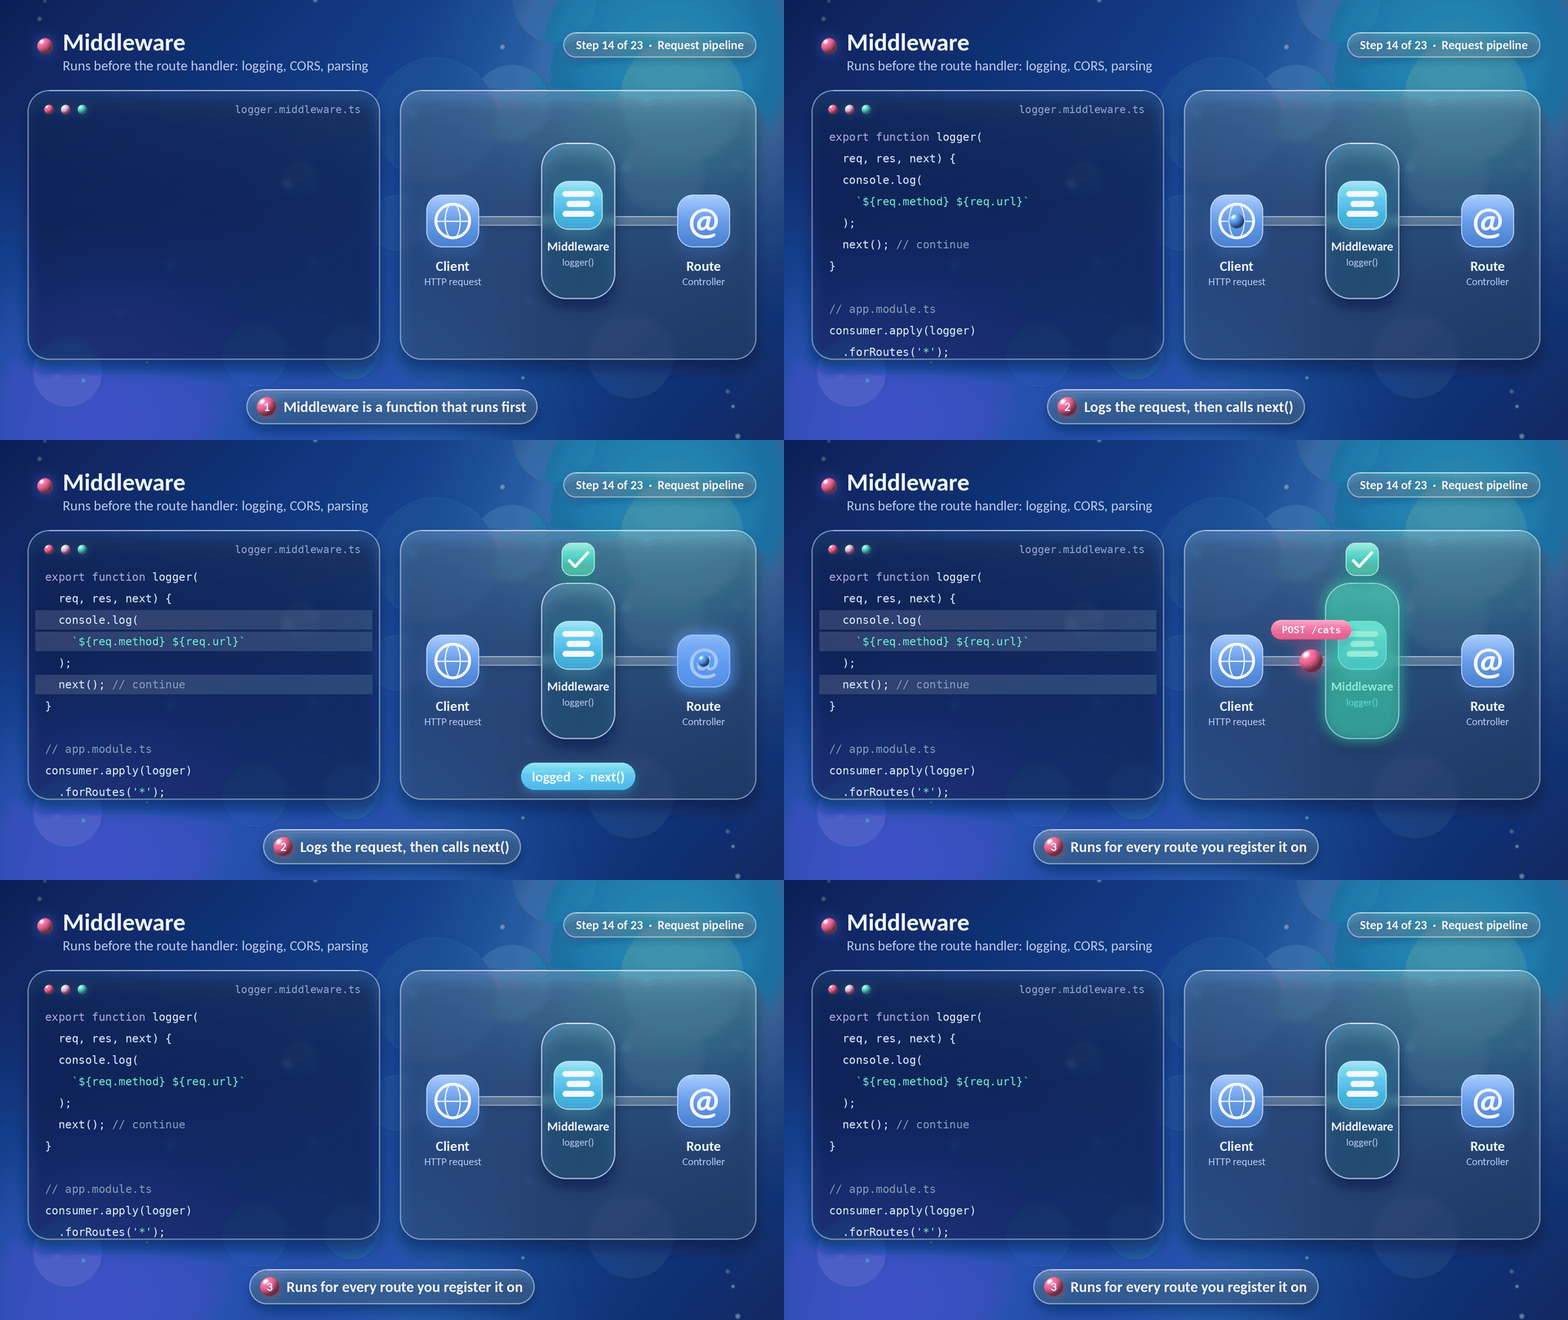
We have arrived at the request pipeline, the series of stations every request passes through. The first station is middleware.
Middleware is a function that runs before the route handler. It can read or change the request and response, and it must either end the response or call next() to continue. That makes it a good fit for work that is not specific to one route, such as logging.
We are going to log every request to our cats endpoints:
// src/common/logger.middleware.ts
import { Injectable, Logger, NestMiddleware } from '@nestjs/common';
import { NextFunction, Request, Response } from 'express';

@Injectable()
export class LoggerMiddleware implements NestMiddleware {
  private readonly logger = new Logger('HTTP');

  use(req: Request, res: Response, next: NextFunction) {
    const { method, originalUrl } = req;
    const startedAt = Date.now();

    res.on('finish', () => {
      this.logger.log(
        `${method} ${originalUrl} ${res.statusCode} +${Date.now() - startedAt}ms`,
      );
    });

    next(); // hand the request to the next station
  }
}
Middleware is attached from inside a module, by implementing NestModule:
// src/app.module.ts
import { MiddlewareConsumer, NestModule } from '@nestjs/common';

export class AppModule implements NestModule {
  configure(consumer: MiddlewareConsumer) {
    consumer.apply(LoggerMiddleware).forRoutes('cats');
  }
}
Now every call to /cats prints a line such as GET /cats/7 200 +4ms. In a complete file, remember to import LoggerMiddleware and make AppModule implement NestModule; the snippet above shows the relevant registration method.
Nest middleware is equivalent to Express middleware, so we can also use well-known packages here. Simple cases can use a plain function (export function logger(req, res, next) { ... }) and be registered with app.use(logger) in main.ts for every route.
Express 5 note: Nest 11 runs on Express 5, which requires wildcards in route strings to be named. When we need a catch-all pattern, we write something like
'{*splat}'rather than a bare'*'. Targeting a path ('cats') or a controller class (forRoutes(CatsController)) avoids the issue.
Quick recap
- Middleware runs before guards. It must call
next()or end the response; otherwise the request hangs. - It suits cross-cutting work like logging, CORS and body parsing.
Step 15: Guards
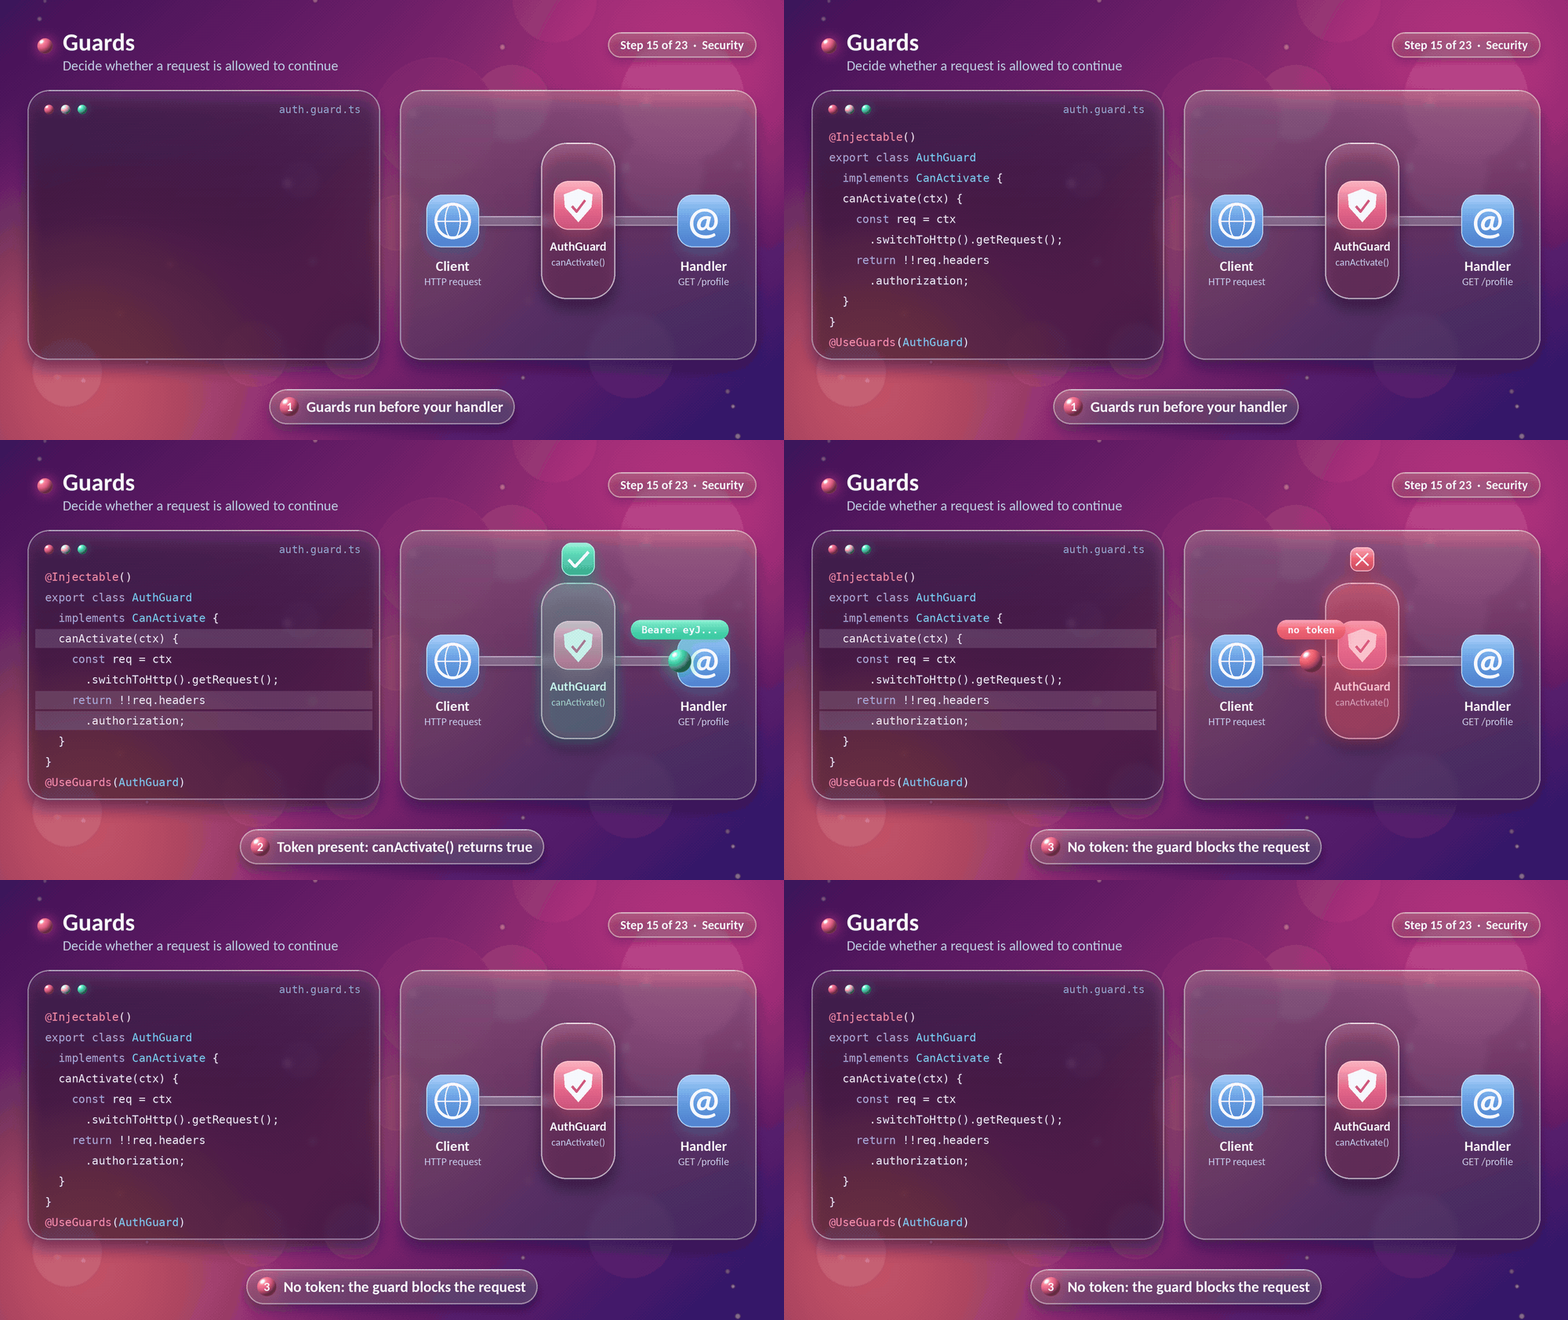
We are going to add guards to our system. A guard answers exactly one question: is this request allowed to continue? It returns true to let the request through, or false to stop it.
Why not do this in middleware? Because a guard has access to the execution context. It knows which controller and which method will run next, and that knowledge is what makes role checks and metadata-based rules possible later.
We start with the simplest version: a request is allowed only if it carries an Authorization header.
// src/auth/auth.guard.ts
import { CanActivate, ExecutionContext, Injectable } from '@nestjs/common';
import { Request } from 'express';

@Injectable()
export class AuthGuard implements CanActivate {
  canActivate(context: ExecutionContext): boolean {
    const request = context.switchToHttp().getRequest<Request>();
    return !!request.headers.authorization;
  }
}
Then we attach it to the route we want to protect:
import { UseGuards } from '@nestjs/common';

@UseGuards(AuthGuard)
@Delete(':id')
remove(@Param('id', ParseIntPipe) id: number) {
  return this.catsService.remove(id);
}
Now a DELETE /cats/7 with a token reaches the handler, and one without it is stopped. When a guard returns false, Nest answers with 403 Forbidden.
A guard can be bound at three levels:
| Level | How |
|---|---|
| One route | @UseGuards(AuthGuard) on a method |
| One controller | @UseGuards(AuthGuard) on the class |
| The whole app | { provide: APP_GUARD, useClass: AuthGuard } in a module |
For global guards, the APP_GUARD provider is the better choice over app.useGlobalGuards(), because it lets the guard use dependency injection. We are going to need that in Step 19.
This first guard only checks that a header exists, which anybody can fake. Do not worry. We are going to upgrade this very same guard to verify a signed token in Step 19.
Quick recap
- A guard decides allow or deny, using
canActivate(). - Guards run after middleware and know which handler is about to run.
Step 16: Interceptors
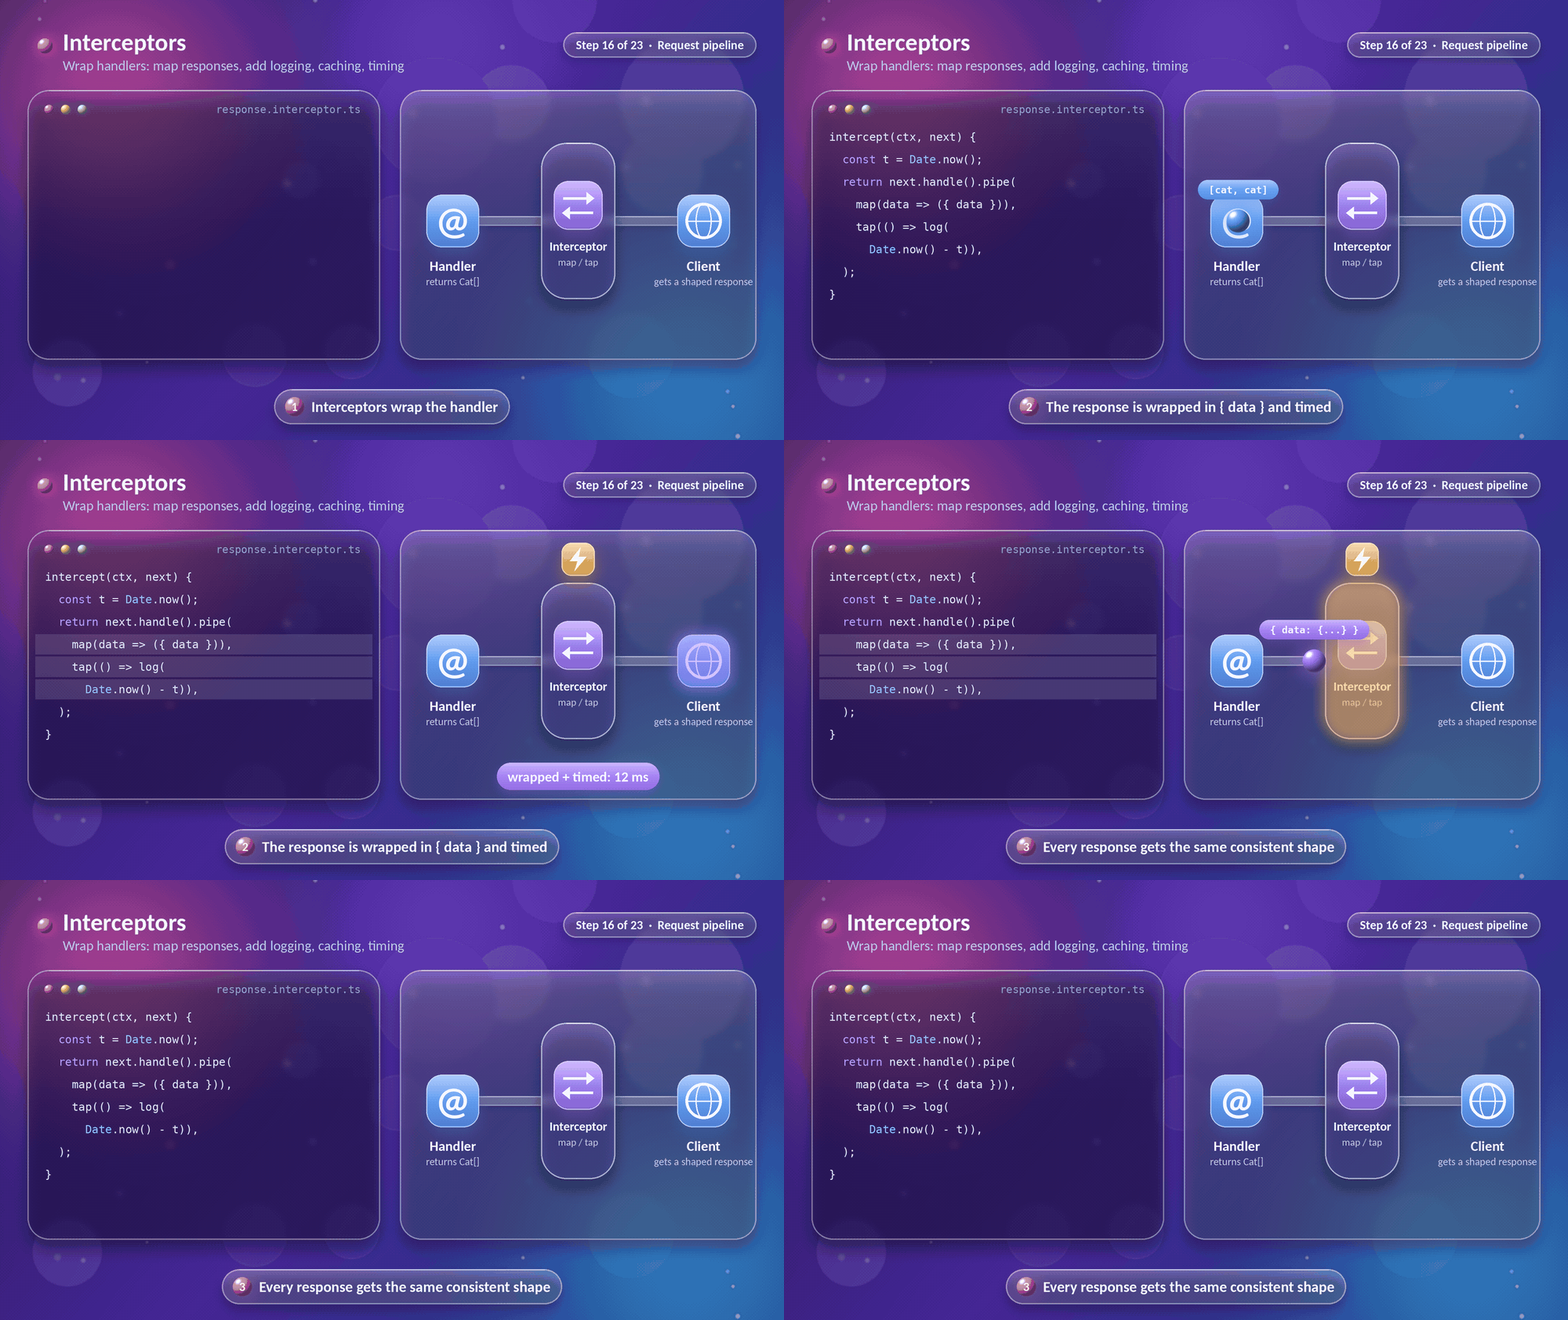
Guards decide whether a request enters. Interceptors wrap the handler itself. They get a chance to act before the handler runs and again after it returns, which is perfect for shaping responses, measuring time, caching and timeouts.
An interceptor receives a next handler. Calling next.handle() runs the rest of the pipeline and gives us back an RxJS stream of the result, which we can transform.
We are going to make every successful response share one shape, { data: ... }, and log how long each request took:
// src/common/transform.interceptor.ts
import {
  CallHandler,
  ExecutionContext,
  Injectable,
  Logger,
  NestInterceptor,
} from '@nestjs/common';
import { Observable } from 'rxjs';
import { map, tap } from 'rxjs/operators';

@Injectable()
export class TransformInterceptor<T> implements NestInterceptor<T, { data: T }> {
  private readonly logger = new Logger('Timing');

  intercept(context: ExecutionContext, next: CallHandler<T>): Observable<{ data: T }> {
    const startedAt = Date.now();

    return next.handle().pipe(
      map((data) => ({ data })),
      tap(() => this.logger.log(`Handled in ${Date.now() - startedAt}ms`)),
    );
  }
}
A handler that returns an array of cats now produces:
{ "data": [ { "id": 1, "name": "Tom", "age": 2 } ] }
A consistent shape makes life easier for whoever consumes our API, since every success response is parsed the same way. Apply this interceptor only if that response envelope is part of your API contract; wrapping responses can affect clients that expect the original payload.
We bind interceptors just like guards:
@UseInterceptors(TransformInterceptor)       // one controller or route
app.useGlobalInterceptors(new TransformInterceptor()); // the whole app
Other jobs that fit this pattern well:
- Timeouts: pipe the stream through RxJS
timeout()to fail slow requests. - Caching: return a stored value without calling the handler at all.
- Mapping errors: use
catchError()to translate low-level errors.
Quick recap
- Interceptors wrap the handler, running logic before and after it.
- RxJS operators like
mapandtaptransform the outgoing result.
Step 17: Exception filters
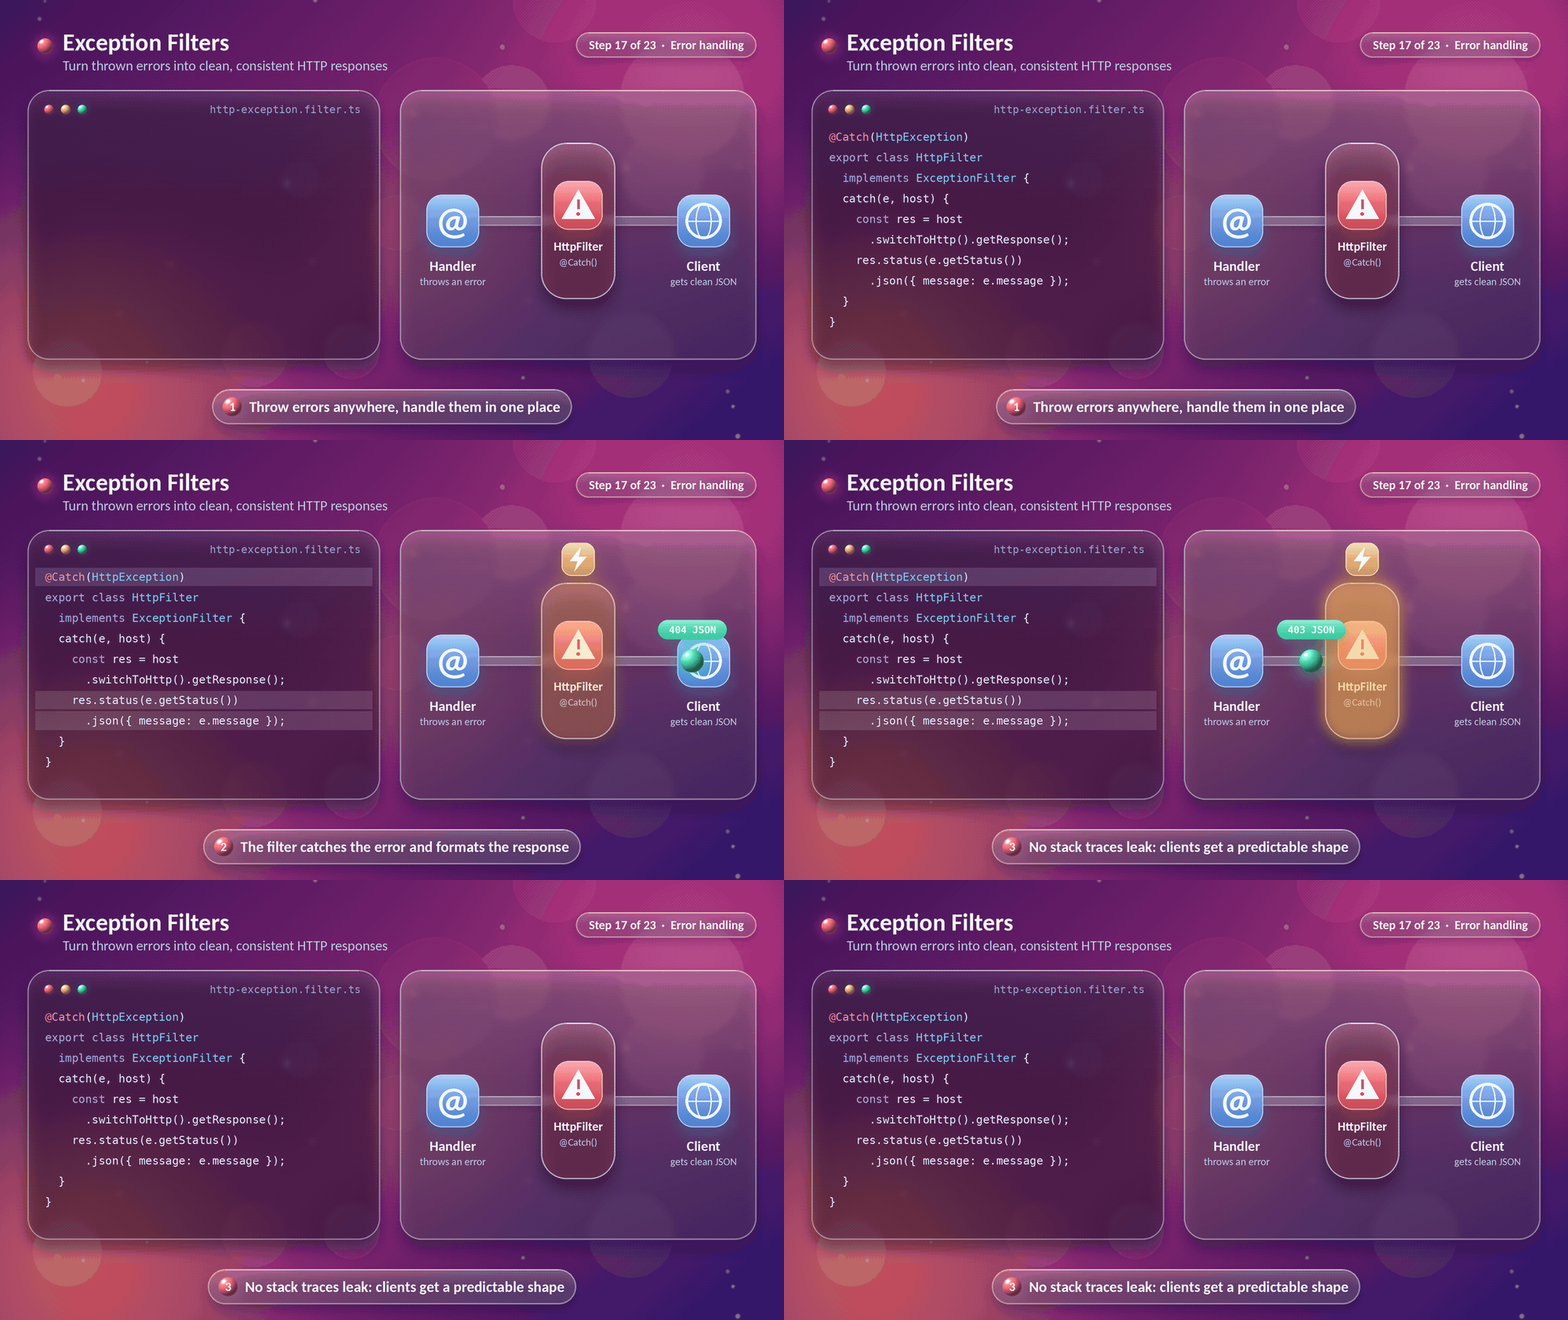
Things go wrong: a cat does not exist, a token expired, a database is down. We are going to throw errors freely in our code and handle them in one place with an exception filter.
Nest has built-in exceptions that already carry the right HTTP status:
| Exception | Status |
|---|---|
BadRequestException | 400 |
UnauthorizedException | 401 |
ForbiddenException | 403 |
NotFoundException | 404 |
ConflictException | 409 |
InternalServerErrorException | 500 |
We already used one in our service: throw new NotFoundException(...). Out of the box, Nest turns it into a neat JSON response. A custom filter lets us decide the exact shape and add extra information:
// src/common/http-exception.filter.ts
import { ArgumentsHost, Catch, ExceptionFilter, HttpException } from '@nestjs/common';
import { Request, Response } from 'express';

@Catch(HttpException)
export class HttpExceptionFilter implements ExceptionFilter {
  catch(exception: HttpException, host: ArgumentsHost) {
    const ctx = host.switchToHttp();
    const response = ctx.getResponse<Response>();
    const request = ctx.getRequest<Request>();

    const status = exception.getStatus();
    const body = exception.getResponse();
    const message =
      typeof body === 'string' ? body : (body as { message?: unknown }).message;

    response.status(status).json({
      statusCode: status,
      message,
      path: request.url,
      timestamp: new Date().toISOString(),
    });
  }
}
Using exception.getResponse() is deliberate. It keeps the detailed message array that ValidationPipe produces, instead of flattening it into one sentence.
Now when a cat is missing, the client receives a predictable shape:
{
  "statusCode": 404,
  "message": "Cat #99 not found",
  "path": "/cats/99",
  "timestamp": "2026-10-31T10:15:00.000Z"
}
We bind filters in the same familiar ways:
@UseFilters(HttpExceptionFilter)               // one route or controller
app.useGlobalFilters(new HttpExceptionFilter()); // the whole app
A filter with an empty @Catch() can catch all thrown exceptions, including unexpected errors that are not HttpExceptions. If you add one, log the full error on the server and return a generic 500 response to the client. Do not expose stack traces, SQL details, or secrets in production responses. The example above intentionally handles only HttpException instances.
Quick recap
- We throw built-in exceptions, and filters turn them into consistent responses.
@Catch(HttpException)handles HTTP errors, a bare@Catch()handles everything.
Step 18: The request lifecycle
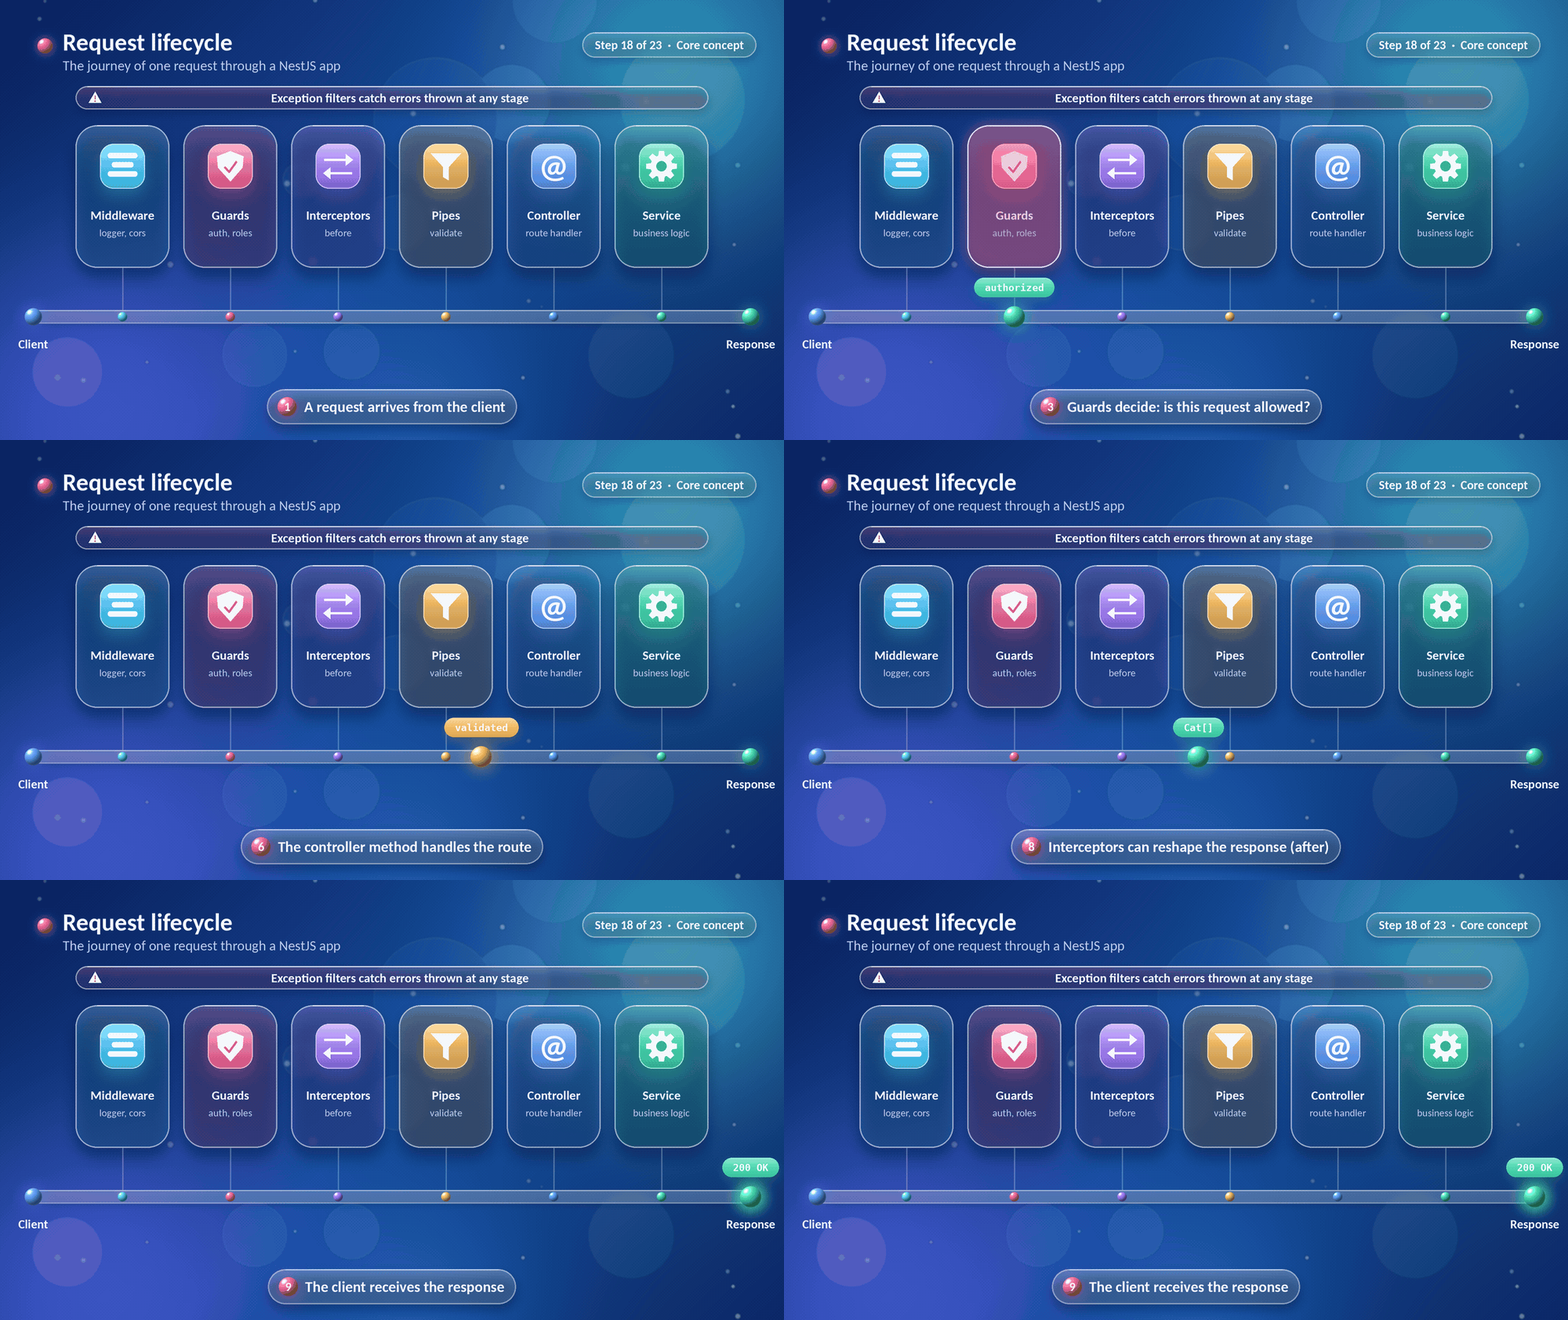
We now know every station. Let's put them in order, because the order explains many surprises.
Incoming request
   |
   v
1. Middleware
2. Guards
3. Interceptors (inbound)
4. Pipes
5. Controller handler
6. Service
7. Interceptors (after the handler)
   |
   v
Response sent to the client

(Exception filters catch errors thrown at any stage above.)
Each stage has one clear question to answer:
| Stage | The question it answers |
|---|---|
| Middleware | Is there generic work to do first? (logging, parsing) |
| Guards | Is this request allowed? |
| Interceptors (before) | Do we need to start a timer or add context? |
| Pipes | Is the input valid, and in the right type? |
| Controller and service | What should actually happen? |
| Interceptors (after) | How should the response look? |
| Exception filters | How should a failure be reported? |
Two details are worth keeping in mind:
- Global, then controller, then route. For guards, interceptors and pipes, the global ones run first, then those on the controller, then those on the route. Interceptors unwind in the opposite order on the way out.
- Filters work from the other end. An exception is first offered to the filter closest to the failing route, then the controller's, then the global ones.
When something behaves strangely, we ask where in this list it lives. A request rejected before the handler is usually a guard or pipe. A response with the wrong shape is usually an interceptor. A confusing error body is a filter.
Quick recap
- Middleware, guards, interceptors, pipes, handler, interceptors, with filters watching for errors.
- Global first, then controller, then route.
Part 5: Security and shipping
Step 19: JWT authentication
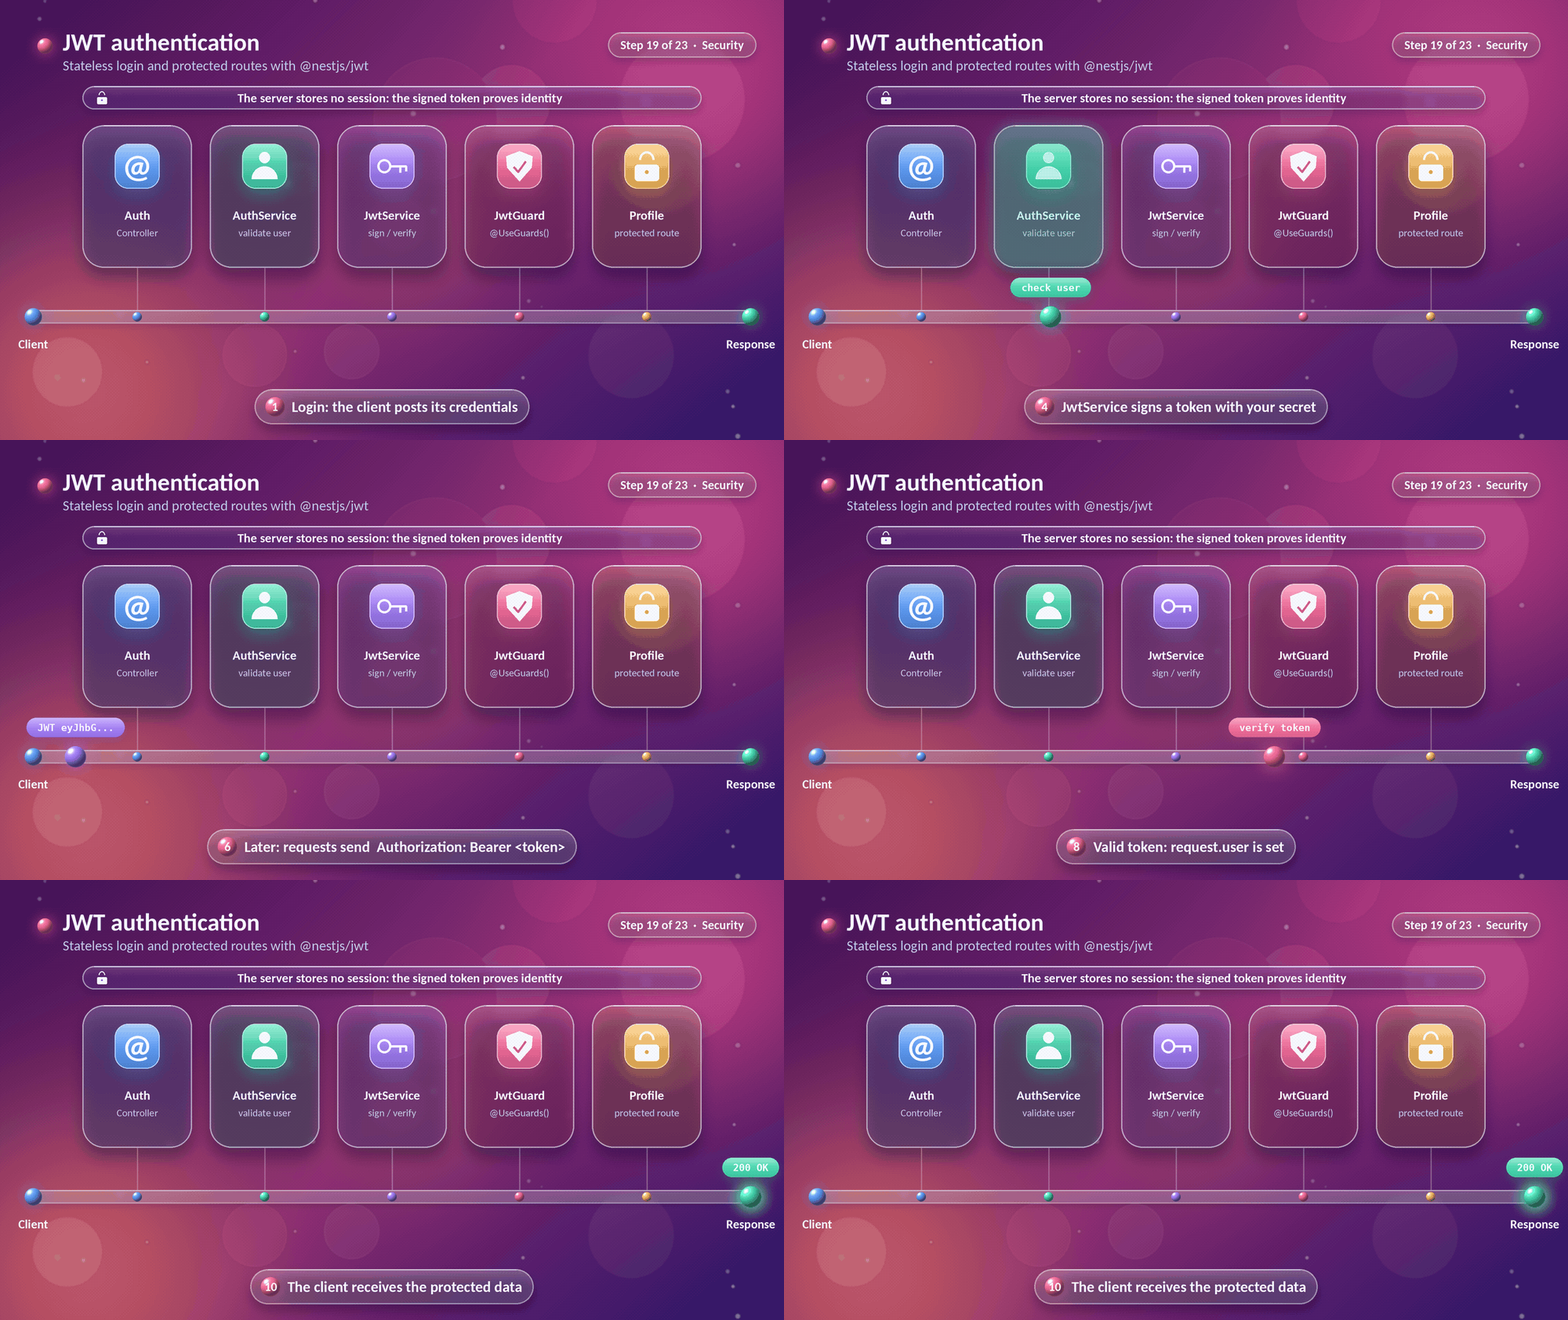
Time to give our API real identity. We are going to add login and protect our routes with JSON Web Tokens (JWT).
A JWT is a token with three parts: a header, a payload (claims such as the user id), and a signature. In this example, the server signs it with a secret and later verifies that signature and the token's expiry. A signed JWT is not encrypted by default, so do not put passwords or other secrets in its payload. The server does not need to store a session for this basic access-token flow, which is why it is commonly described as stateless.
Here is the flow we are going to build:
- The client sends credentials to
POST /auth/login. AuthServicechecks the user and the password hash.JwtServicesigns a token and returns it.- The client stores the token and sends
Authorization: Bearer <token>on later requests. - Our guard verifies the signature and attaches the user to the request.
We install what we need:
npm install @nestjs/jwt bcrypt
npm install -D @types/bcrypt
Users and password hashing
We never store plain passwords. We store a hash. To keep the focus on authentication, we keep users in memory here. This is demonstration-only: users disappear when the process restarts, and multiple server instances will not share the same user list. A real application should persist users in a database, enforce a unique email constraint, and use the repository pattern from Step 12.
// src/users/role.enum.ts
export enum Role {
  User = 'user',
  Admin = 'admin',
}
// src/users/users.service.ts
import { Injectable } from '@nestjs/common';
import * as bcrypt from 'bcrypt';
import { Role } from './role.enum';

export interface User {
  id: number;
  email: string;
  passwordHash: string;
  role: Role;
}

@Injectable()
export class UsersService {
  private users: User[] = [];
  private nextId = 1;

  async create(email: string, password: string, role: Role = Role.User) {
    const passwordHash = await bcrypt.hash(password, 10);
    const user: User = { id: this.nextId++, email, passwordHash, role };
    this.users.push(user);
    return user;
  }

  findByEmail(email: string) {
    return this.users.find((u) => u.email === email);
  }
}
// src/users/users.module.ts
@Module({
  providers: [UsersService],
  exports: [UsersService], // shared, exactly like we learned in Step 5
})
export class UsersModule {}
The auth service
// src/auth/auth.service.ts
import { ConflictException, Injectable, UnauthorizedException } from '@nestjs/common';
import { JwtService } from '@nestjs/jwt';
import * as bcrypt from 'bcrypt';
import { UsersService } from '../users/users.service';

@Injectable()
export class AuthService {
  constructor(
    private readonly usersService: UsersService,
    private readonly jwtService: JwtService,
  ) {}

  async register(email: string, password: string) {
    if (this.usersService.findByEmail(email)) {
      throw new ConflictException('Email is already registered');
    }
    const user = await this.usersService.create(email, password);
    return { id: user.id, email: user.email };
  }

  async signIn(email: string, password: string) {
    const user = this.usersService.findByEmail(email);
    if (!user || !(await bcrypt.compare(password, user.passwordHash))) {
      throw new UnauthorizedException('Invalid credentials');
    }

    const payload = { sub: user.id, email: user.email, role: user.role };
    return { access_token: await this.jwtService.signAsync(payload) };
  }
}
Notice that both "unknown email" and "wrong password" produce the same error. That is intentional, so attackers cannot discover which emails are registered.
Credentials DTO and controller
// src/auth/dto/auth-credentials.dto.ts
import { IsEmail, IsString, MinLength } from 'class-validator';

export class AuthCredentialsDto {
  @IsEmail()
  email: string;

  @IsString()
  @MinLength(8)
  password: string;
}
// src/auth/auth.controller.ts
@Controller('auth')
export class AuthController {
  constructor(private readonly authService: AuthService) {}

  @Public()
  @Post('register')
  register(@Body() dto: AuthCredentialsDto) {
    return this.authService.register(dto.email, dto.password);
  }

  @Public()
  @HttpCode(HttpStatus.OK)
  @Post('login')
  signIn(@Body() dto: AuthCredentialsDto) {
    return this.authService.signIn(dto.email, dto.password);
  }

  @Get('profile')
  getProfile(@Req() req: Request) {
    return req['user'];
  }
}
Upgrading our guard
Here is the promised moment. We take the guard from Step 15 and make it verify a real token:
// src/auth/public.decorator.ts
import { SetMetadata } from '@nestjs/common';

export const IS_PUBLIC_KEY = 'isPublic';
export const Public = () => SetMetadata(IS_PUBLIC_KEY, true);
// src/auth/auth.guard.ts
import {
  CanActivate,
  ExecutionContext,
  Injectable,
  UnauthorizedException,
} from '@nestjs/common';
import { Reflector } from '@nestjs/core';
import { JwtService } from '@nestjs/jwt';
import { Request } from 'express';
import { IS_PUBLIC_KEY } from './public.decorator';

@Injectable()
export class AuthGuard implements CanActivate {
  constructor(
    private readonly jwtService: JwtService,
    private readonly reflector: Reflector,
  ) {}

  async canActivate(context: ExecutionContext): Promise<boolean> {
    const isPublic = this.reflector.getAllAndOverride<boolean>(IS_PUBLIC_KEY, [
      context.getHandler(),
      context.getClass(),
    ]);
    if (isPublic) return true;

    const request = context.switchToHttp().getRequest<Request>();
    const token = this.extractTokenFromHeader(request);
    if (!token) throw new UnauthorizedException();

    try {
      request['user'] = await this.jwtService.verifyAsync(token);
    } catch {
      throw new UnauthorizedException();
    }
    return true;
  }

  private extractTokenFromHeader(request: Request): string | undefined {
    const [type, token] = request.headers.authorization?.split(' ') ?? [];
    return type === 'Bearer' ? token : undefined;
  }
}
Three upgrades happened at once. The guard now throws UnauthorizedException, giving us the correct 401 instead of 403. It verifies the signature and expiry through JwtService. And it respects a @Public() marker, read with Reflector, so we can make every route private by default and open only the ones that should be open.
Wiring the module
// src/auth/auth.module.ts
import { APP_GUARD } from '@nestjs/core';

@Module({
  imports: [
    UsersModule,
    JwtModule.registerAsync({
      global: true,
      inject: [ConfigService],
      useFactory: (config: ConfigService) => ({
        secret: config.get<string>('jwt.secret'),
        signOptions: { expiresIn: '15m' },
      }),
    }),
  ],
  controllers: [AuthController],
  providers: [AuthService, { provide: APP_GUARD, useClass: AuthGuard }],
})
export class AuthModule {}
The secret comes from configuration (Step 13), and tokens expire after fifteen minutes. Ensure the secret is a long, randomly generated value supplied by the deployment environment—not the example value from .env. Registering the guard with APP_GUARD protects the whole application. We then mark the read-only list as open:
@Public()
@Get()
findAll() {
  return this.catsService.findAll();
}
Trying it out
# 1. Register
curl -X POST http://localhost:3000/auth/register \
  -H 'Content-Type: application/json' \
  -d '{"email":"tom@cats.dev","password":"meow-meow-1"}'

# 2. Log in and copy the access_token
curl -X POST http://localhost:3000/auth/login \
  -H 'Content-Type: application/json' \
  -d '{"email":"tom@cats.dev","password":"meow-meow-1"}'

# 3. Call a protected route
curl http://localhost:3000/auth/profile \
  -H 'Authorization: Bearer <access_token>'
Without the header, step 3 returns 401 Unauthorized. With it, we get the token's payload back.
Where we can go from here: short-lived access tokens are commonly paired with refresh tokens, and some teams keep tokens in
httpOnlycookies instead of headers. Nest also offers the@nestjs/passportpackage for strategy-based authentication. The guard we wrote is the same building block they all rely on.
Quick recap
- Passwords are hashed with bcrypt, tokens are signed with
JwtService. - One global guard protects everything, and
@Public()opens the exceptions.
Step 20: Role-based access control
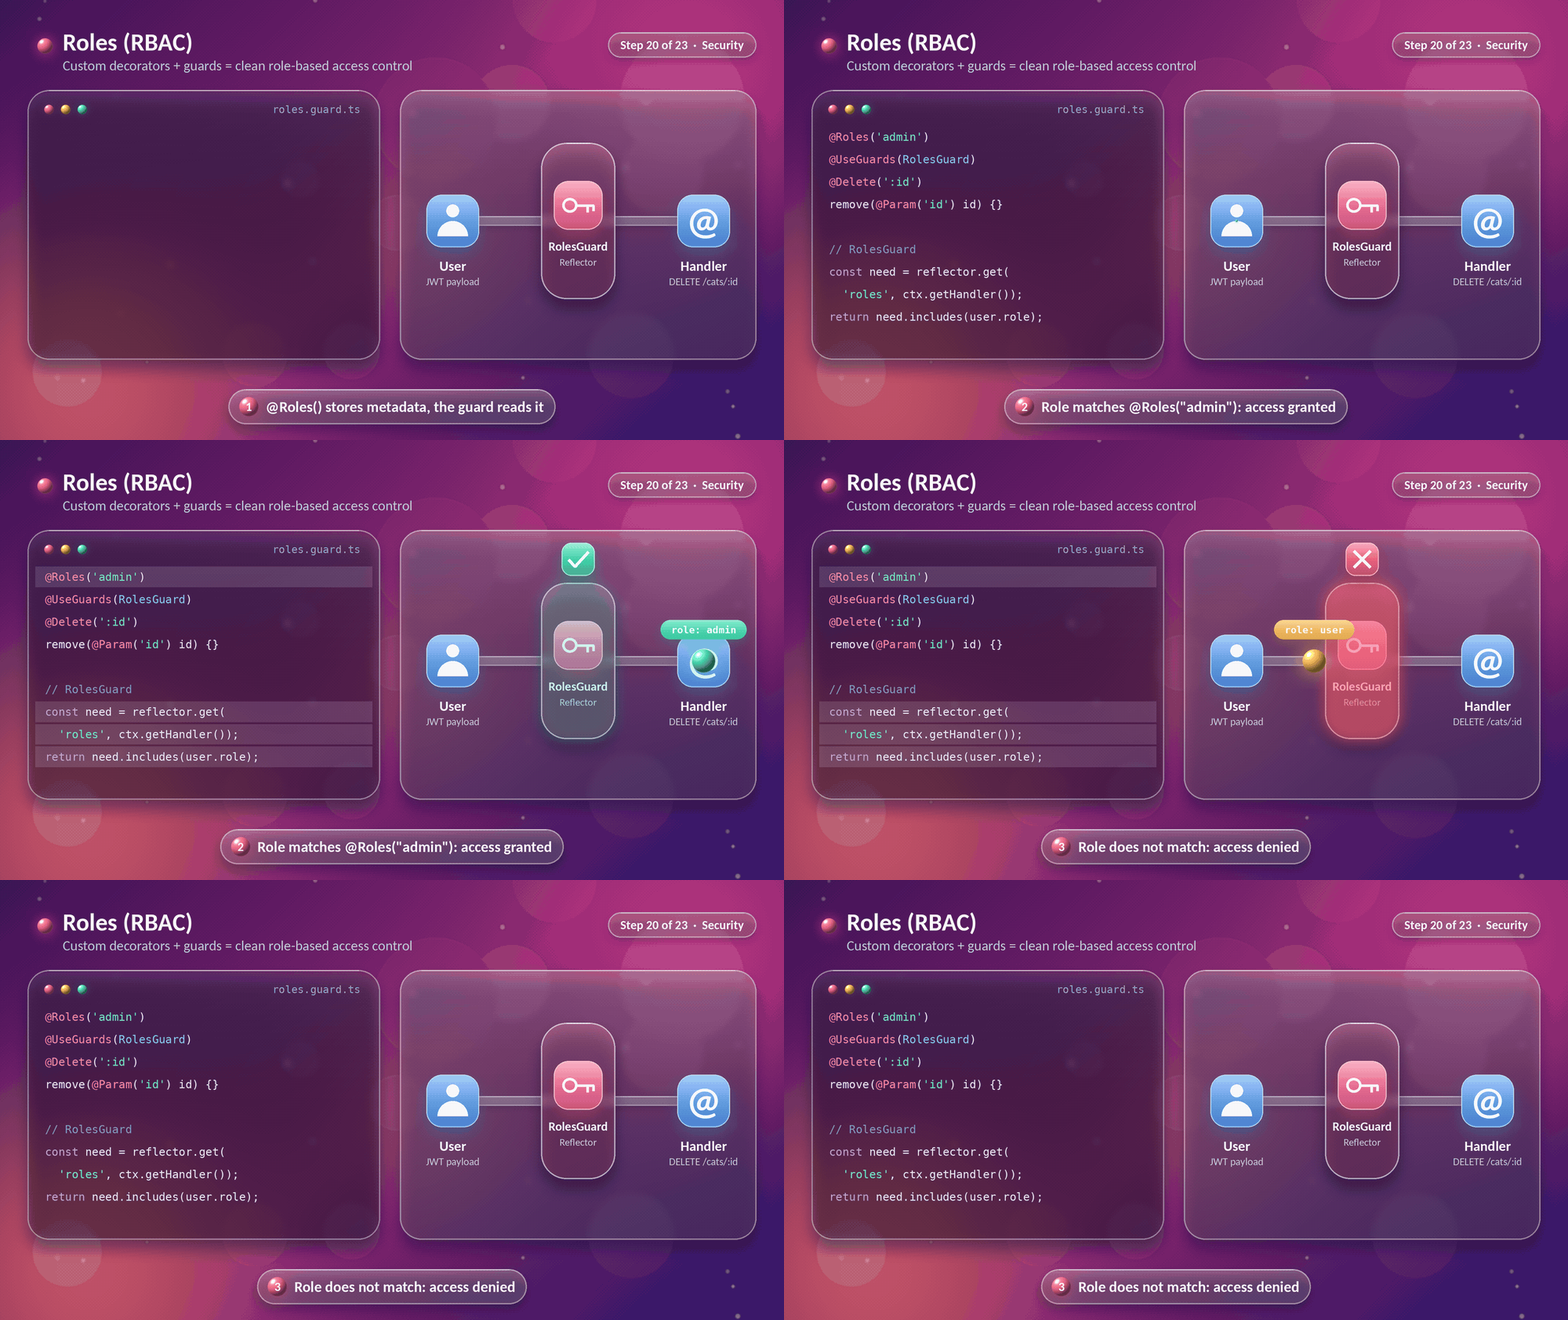
Knowing who a user is, is only half of security. We also need to decide what they may do. We are going to add role-based access control, so only admins can delete cats.
The trick is to combine two Nest features we already know: custom decorators that attach metadata to a route, and a guard that reads it.
First, the decorator. It stores the allowed roles as metadata:
// src/auth/roles.decorator.ts
import { SetMetadata } from '@nestjs/common';
import { Role } from '../users/role.enum';

export const ROLES_KEY = 'roles';
export const Roles = (...roles: Role[]) => SetMetadata(ROLES_KEY, roles);
Then the guard. It reads that metadata and compares it with the role stored in the token's payload, which our AuthGuard already attached to request.user:
// src/auth/roles.guard.ts
import { CanActivate, ExecutionContext, Injectable } from '@nestjs/common';
import { Reflector } from '@nestjs/core';
import { Role } from '../users/role.enum';
import { ROLES_KEY } from './roles.decorator';

@Injectable()
export class RolesGuard implements CanActivate {
  constructor(private readonly reflector: Reflector) {}

  canActivate(context: ExecutionContext): boolean {
    const requiredRoles = this.reflector.getAllAndOverride<Role[]>(ROLES_KEY, [
      context.getHandler(),
      context.getClass(),
    ]);
    if (!requiredRoles) return true; // no restriction on this route

    const { user } = context.switchToHttp().getRequest();
    return requiredRoles.includes(user?.role);
  }
}
Using it takes two decorators on the route. Make sure RolesGuard is registered as a provider in the module that uses it (or in a shared module):
@Roles(Role.Admin)
@UseGuards(RolesGuard)
@Delete(':id')
remove(@Param('id', ParseIntPipe) id: number) {
  return this.catsService.remove(id);
}
Here is the order of events for DELETE /cats/7:
- Our global
AuthGuardruns first, verifies the token and setsrequest.user. RolesGuardreads@Roles(Role.Admin)from the route.- A user whose role is
adminpasses. A user whose role isusergets403 Forbidden.
Note the difference between the two failures. 401 means "we do not know who you are", and 403 means "we know who you are, and the answer is no". Using both correctly makes an API much easier to debug.
Because the rule lives in the decorator, the route itself reads like documentation: @Roles(Role.Admin) says exactly who may call it.
Quick recap
- A decorator stores metadata, a guard reads it with
Reflector. - 401 means unauthenticated, 403 means not allowed.
Step 21: Security layers
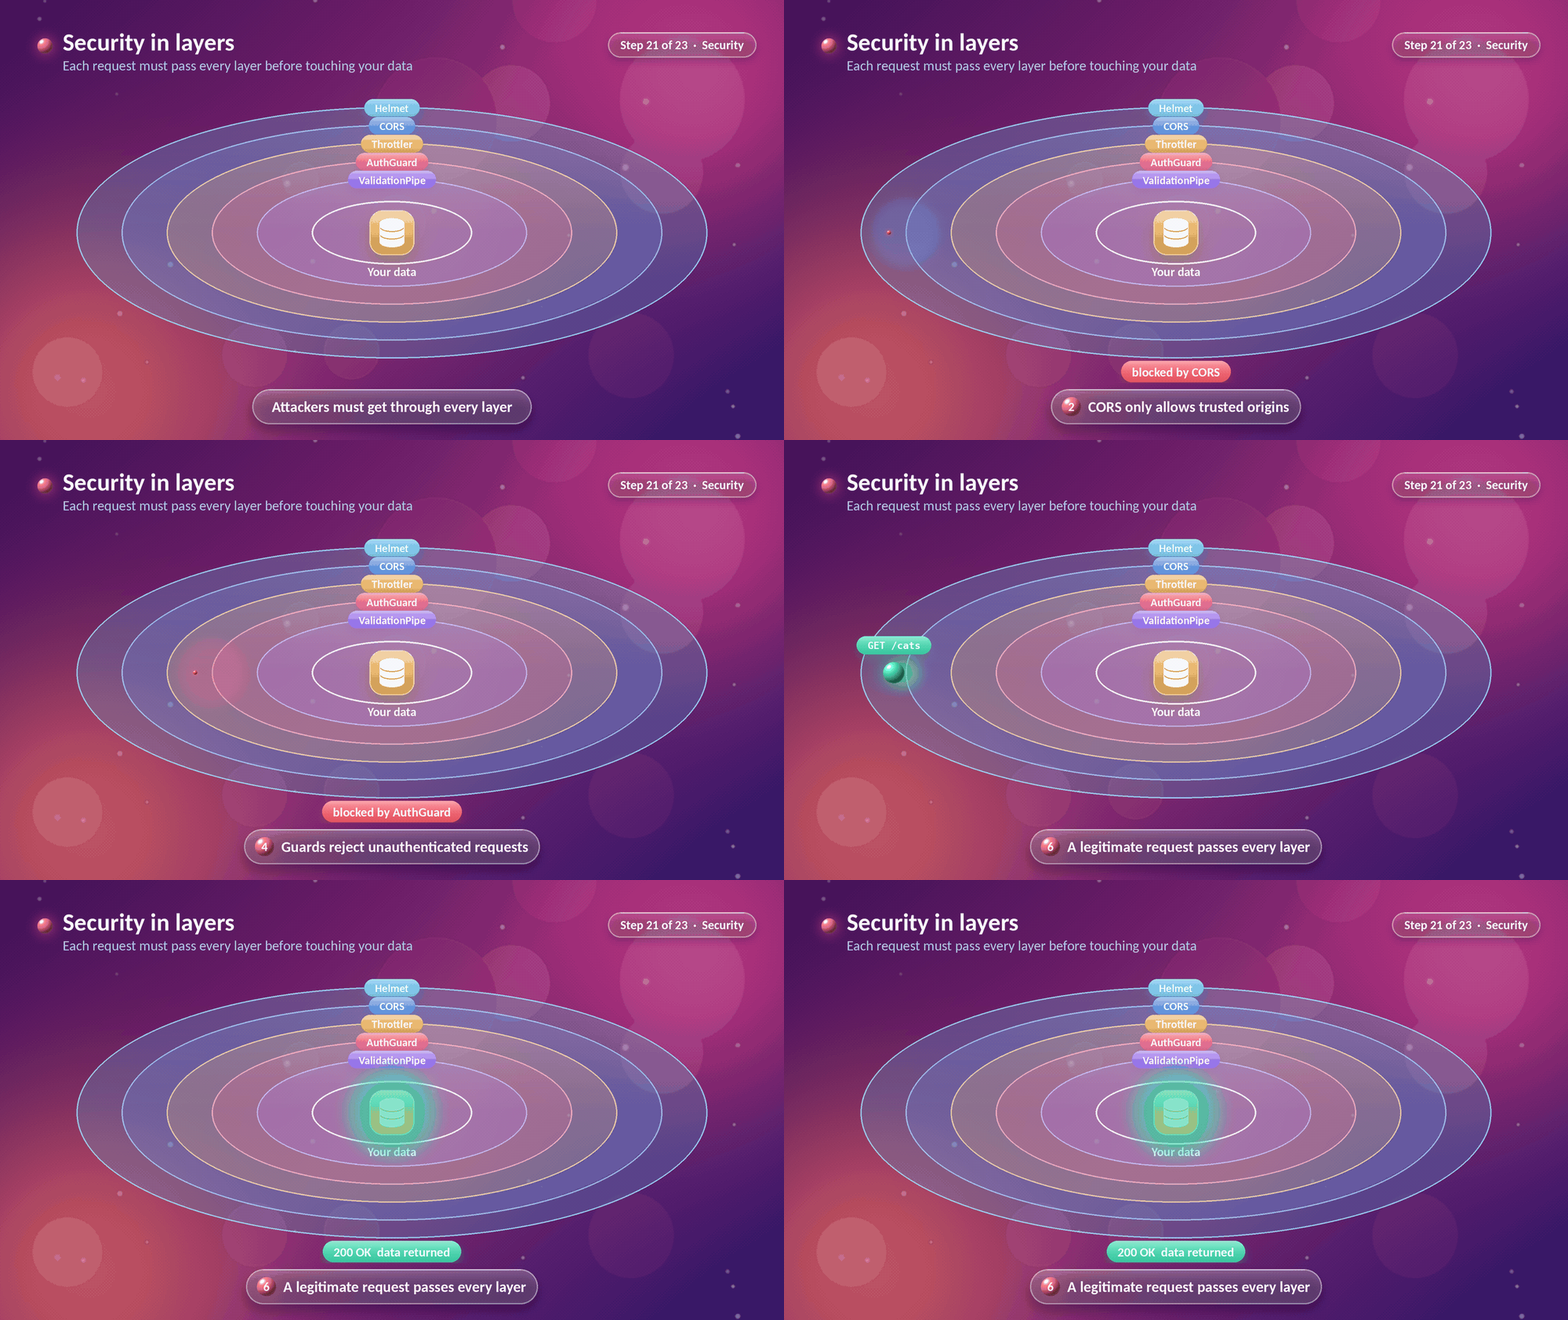
Good security is never one wall, it is layers. Each layer stops a different kind of attack, and a request must pass all of them before it touches our data. We already added two layers (guards and validation). Now we are going to add the rest.
Layer 1: Helmet
Helmet sets secure HTTP headers that protect against common attacks such as cross-site scripting and clickjacking.
npm install helmet
import helmet from 'helmet';

app.use(helmet());
Layer 2: CORS
CORS tells browsers which origins are allowed to read responses from our API. It is not authentication and does not stop non-browser clients. Allow only the origins you trust; when credentials: true is enabled, do not use origin: '*'.
app.enableCors({
  origin: ['https://cats.example.com'],
  credentials: true,
});
Layer 3: Rate limiting
Rate limiting slows down brute-force and abusive clients. The throttler package counts requests per client and rejects extras with 429 Too Many Requests.
npm install @nestjs/throttler
// src/app.module.ts
import { APP_GUARD } from '@nestjs/core';
import { ThrottlerGuard, ThrottlerModule } from '@nestjs/throttler';

@Module({
  imports: [
    ThrottlerModule.forRoot([
      {
        ttl: 60000, // time window in milliseconds
        limit: 10,  // max requests per window
      },
    ]),
    // ...other imports
  ],
  providers: [{ provide: APP_GUARD, useClass: ThrottlerGuard }],
})
export class AppModule {}
Some routes need different rules. A login endpoint deserves a much tighter limit:
@Throttle({ default: { limit: 3, ttl: 60000 } })
@Post('login')
signIn(@Body() dto: AuthCredentialsDto) { /* ... */ }
And a health check can opt out entirely with @SkipThrottle().
Behind a proxy? When the app runs behind a trusted load balancer, the client's address may be forwarded in
X-Forwarded-For. Configure Express'strust proxysetting for your actual deployment topology only. Do not blindly trust forwarded headers from arbitrary clients, because that can let attackers spoof their IP and bypass rate limits.
Layers 4 and 5: Authentication, authorization and validation
These are the layers we built earlier. AuthGuard rejects requests without a valid token, RolesGuard enforces permissions, and ValidationPipe validates request data. Use both whitelist and forbidNonWhitelisted when you want unknown fields rejected rather than silently removed.
Our final main.ts
Everything we have configured comes together in one readable file:
// src/main.ts
import { NestFactory } from '@nestjs/core';
import { ValidationPipe } from '@nestjs/common';
import { ConfigService } from '@nestjs/config';
import helmet from 'helmet';
import { AppModule } from './app.module';
import { HttpExceptionFilter } from './common/http-exception.filter';
import { TransformInterceptor } from './common/transform.interceptor';

async function bootstrap() {
  const app = await NestFactory.create(AppModule);

  app.use(helmet());
  app.enableCors({ origin: ['https://cats.example.com'], credentials: true });

  app.useGlobalPipes(
    new ValidationPipe({ whitelist: true, forbidNonWhitelisted: true, transform: true }),
  );
  app.useGlobalFilters(new HttpExceptionFilter());
  app.useGlobalInterceptors(new TransformInterceptor());

  const config = app.get(ConfigService);
  await app.listen(config.get<number>('port') ?? 3000);
}
bootstrap();
A security checklist
| Concern | What we did |
|---|---|
| Secrets in code | Moved to environment variables (Step 13) |
| Passwords | Hashed with bcrypt, never stored in plain text (Step 19) |
| Unauthenticated access | Global AuthGuard, routes private by default (Step 19) |
| Excess privileges | Role checks with RolesGuard (Step 20) |
| Malicious input | ValidationPipe with whitelist (Step 11) |
| Brute force | Throttler, with stricter limits on login (Step 21) |
| Browser attacks | Helmet and a strict CORS list (Step 21) |
| Leaking internals | Exception filter hides stack traces (Step 17) |
We also remember what lives outside the code: serve everything over HTTPS, keep dependencies updated, and rotate secrets when anyone who knew them leaves.
Quick recap
- Layer defenses: Helmet, CORS, rate limiting, guards, validation.
- Each layer blocks a different class of attack.
Step 22: Testing
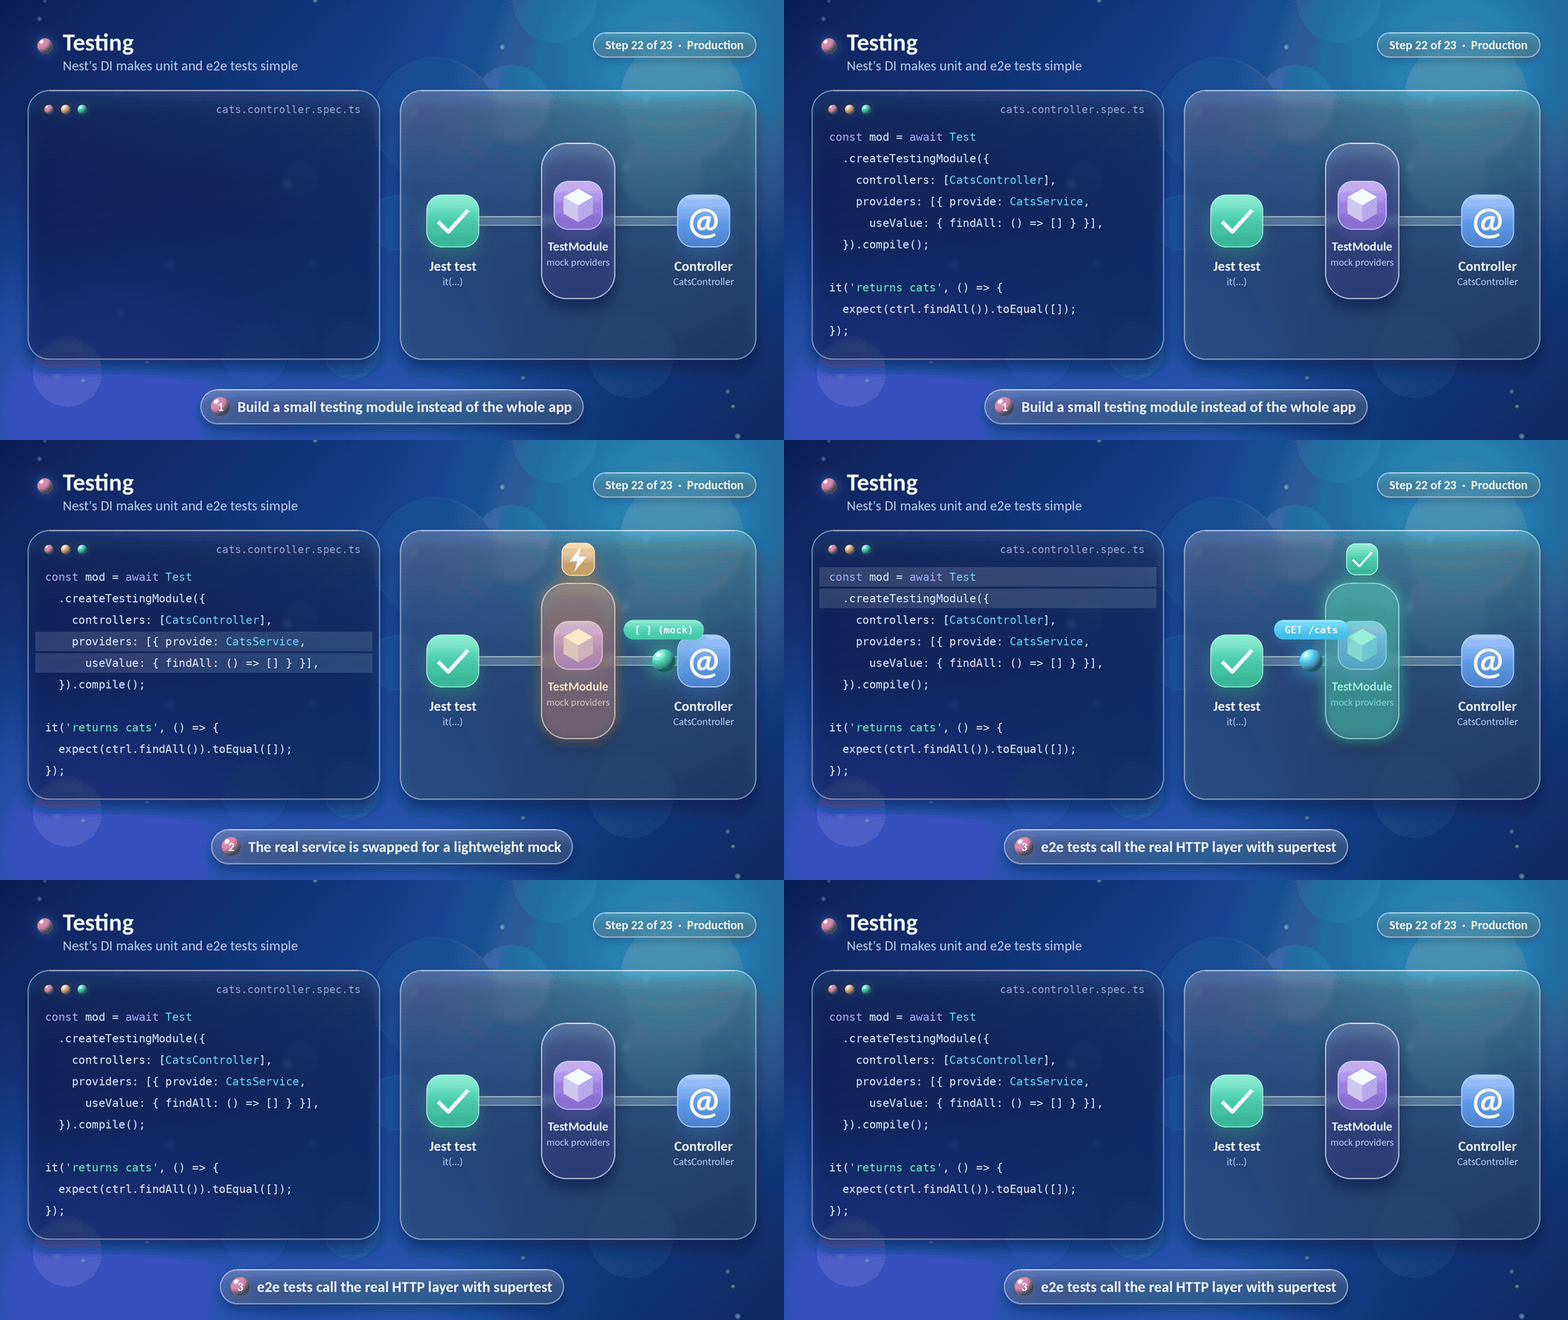
Nest's dependency injection pays off most when we test. Because dependencies are injected, we can replace a real service with a lightweight mock in a few lines. Jest is already set up by the CLI.
A unit test with a mocked service
We build a tiny testing module that contains only what the test needs:
// src/cats/cats.controller.spec.ts
import { Test } from '@nestjs/testing';
import { CatsController } from './cats.controller';
import { CatsService } from './cats.service';

describe('CatsController', () => {
  let controller: CatsController;

  const catsServiceMock = {
    findAll: jest.fn().mockResolvedValue([]),
  };

  beforeEach(async () => {
    const moduleRef = await Test.createTestingModule({
      controllers: [CatsController],
      providers: [{ provide: CatsService, useValue: catsServiceMock }],
    }).compile();

    controller = moduleRef.get(CatsController);
  });

  it('returns cats', async () => {
    await expect(controller.findAll()).resolves.toEqual([]);
    expect(catsServiceMock.findAll).toHaveBeenCalled();
  });
});
Look at the providers line. It is the same useValue custom provider we met in Step 9, now used to swap in a mock. The controller never knows the difference. No database is needed, and the test runs in milliseconds.
An end-to-end test
Unit tests check pieces. End-to-end tests call the real HTTP layer with supertest, so guards, pipes and routing are all exercised together:
// test/cats.e2e-spec.ts
import { INestApplication, ValidationPipe } from '@nestjs/common';
import { Test } from '@nestjs/testing';
import request from 'supertest';
import { AppModule } from '../src/app.module';

describe('Cats (e2e)', () => {
  let app: INestApplication;

  beforeAll(async () => {
    const moduleRef = await Test.createTestingModule({
      imports: [AppModule],
    }).compile();

    app = moduleRef.createNestApplication();
    // main.ts is not executed in tests, so we repeat our global setup here
    app.useGlobalPipes(new ValidationPipe({ whitelist: true, transform: true }));
    await app.init();
  });

  afterAll(async () => {
    await app.close();
  });

  // This test assumes GET /cats is marked with @Public().
  it('GET /cats returns 200', () => {
    return request(app.getHttpServer()).get('/cats').expect(200);
  });

  it('DELETE /cats/1 without a token returns 401', () => {
    return request(app.getHttpServer()).delete('/cats/1').expect(401);
  });
});
Two lessons hide in this file. First, main.ts is not run in tests, so global pipes, filters and interceptors must be added again. Second, with a real database in the loop, point tests at a dedicated test database, or replace the repository with .overrideProvider(getRepositoryToken(Cat)).useValue(mockRepository). The sample e2e test also assumes that the route /cats is public; otherwise the global authentication guard will return 401.
We run everything with:
npm run test        # unit tests
npm run test:e2e    # end-to-end tests
npm run test:cov    # coverage report
Quick recap
Test.createTestingModulebuilds a small app with only what a test needs.- Mocks are just custom providers, and e2e tests use
supertest.
Step 23: Build and deploy
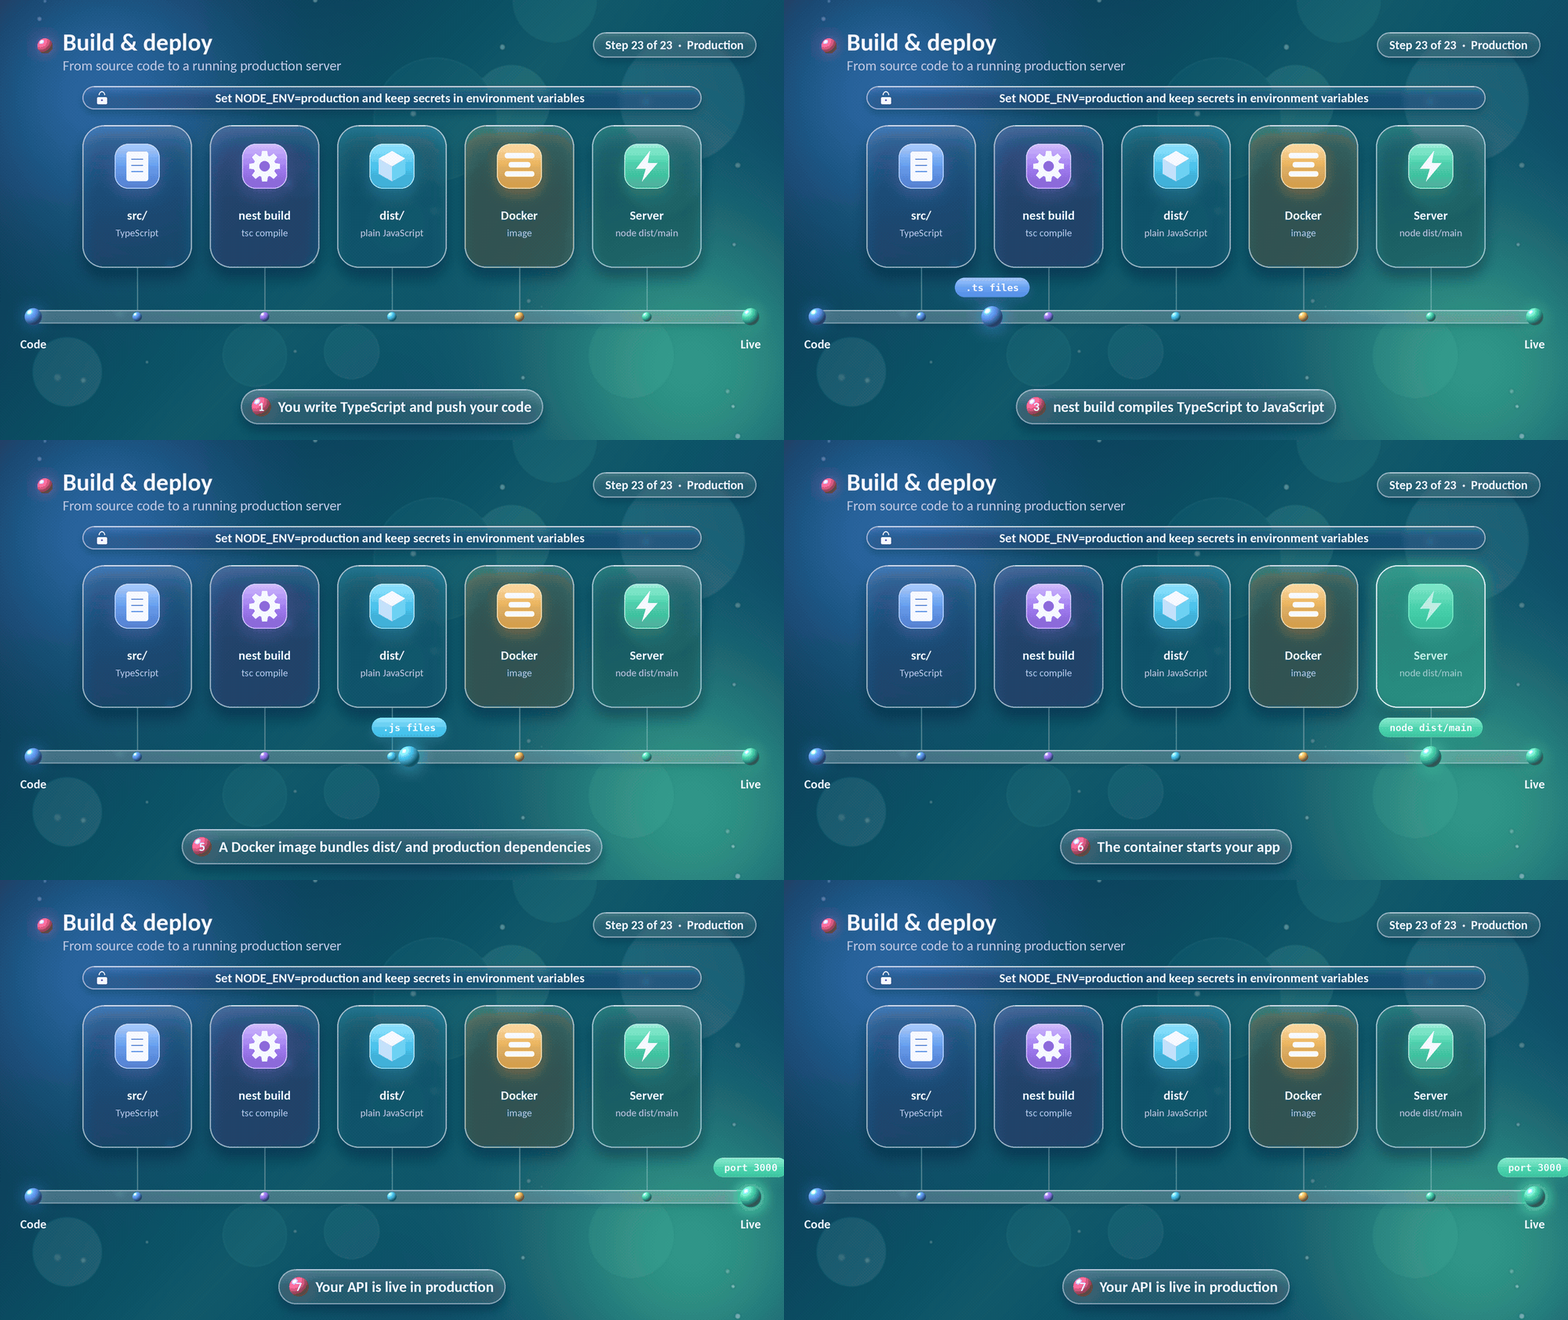
Our API works, it is secure, and it is tested. The final step is to ship it. The journey is short: compile, package, run.
Build
npm run build
nest build compiles the TypeScript in src/ into plain JavaScript in dist/. In production, we run that output with Node directly:
npm run start:prod # node dist/main
Package with Docker
A multi-stage Dockerfile keeps the final image small. The first stage builds, and the second stage carries only the compiled code and production dependencies.
# ---- build stage ----
FROM node:22-alpine AS build
WORKDIR /app
COPY package*.json ./
RUN npm ci
COPY . .
RUN npm run build

# ---- runtime stage ----
FROM node:22-alpine
WORKDIR /app
ENV NODE_ENV=production
COPY package*.json ./
RUN npm ci --omit=dev
COPY --from=build /app/dist ./dist
EXPOSE 3000
CMD ["node", "dist/main"]
We also add a .dockerignore, so that local files never end up in the image:
node_modules
dist
.env
.env.*
!.env.example
.git
Then we build and run it, passing configuration at runtime:
docker build -t cats-app .
docker run -p 3000:3000 --env-file .env.production cats-app
The production checklist
Before the first real deployment, we run through this list:
| Item | Why it matters |
|---|---|
NODE_ENV=production | Enables production behavior in Nest and libraries |
| Secrets as environment variables | Nothing sensitive is baked into the image |
synchronize: false plus migrations | Schema changes become explicit and reviewable |
app.enableShutdownHooks() | Lets the app close connections cleanly on stop signals |
| A health endpoint | Load balancers need something to ask. @nestjs/terminus provides this |
| HTTPS in front of the app | Usually terminated by a proxy or platform |
| CI running lint, tests and build | Broken code never reaches production |
The same image can run on a container platform, Kubernetes, or a virtual machine, provided the runtime environment supplies the required variables and networking. We now have a repeatable path from a source commit to a deployable image.
Quick recap
nest buildproducesdist/, andnode dist/mainruns it.- A multi-stage Docker image packages it, configured entirely through the environment.
What we built
Let's look back. Step by step, we turned an empty folder into a well-structured API with many of the building blocks used in production. The examples are a learning foundation, not a complete production implementation: persistence, migrations, secret management, authorization checks, observability and deployment settings still need to be adapted to the application.
| Part | What we added | Steps |
|---|---|---|
| Foundations | The CLI, the file layout and the vocabulary | 1 to 4 |
| Core | Modules, controllers, providers and dependency injection | 5 to 9 |
| Data and input | Pipes, DTOs, a database and configuration | 10 to 13 |
| Request pipeline | Middleware, guards, interceptors and filters, and how they fit | 14 to 18 |
| Security and shipping | JWT, roles, security layers, tests and deployment | 19 to 23 |
And here is the final shape of our project:
src/
├── main.ts
├── app.module.ts
├── config/
│   └── configuration.ts
├── common/
│   ├── logger.middleware.ts
│   ├── transform.interceptor.ts
│   └── http-exception.filter.ts
├── auth/
│   ├── auth.module.ts
│   ├── auth.controller.ts
│   ├── auth.service.ts
│   ├── auth.guard.ts
│   ├── roles.guard.ts
│   ├── roles.decorator.ts
│   ├── public.decorator.ts
│   └── dto/
│       └── auth-credentials.dto.ts
├── users/
│   ├── users.module.ts
│   ├── users.service.ts
│   └── role.enum.ts
└── cats/
    ├── cats.module.ts
    ├── cats.controller.ts
    ├── cats.service.ts
    ├── dto/
    └── entities/
Where we go next
NestJS has much more to explore, and every topic below builds on the same ideas we just learned:
- API documentation with
@nestjs/swagger, generating interactive docs from our decorators. - GraphQL as an alternative or addition to REST.
- WebSockets for real-time features.
- Microservices with message brokers such as NATS, RabbitMQ or Kafka.
- Queues and background jobs with BullMQ.
- Caching with the built-in cache manager.
- Health checks with
@nestjs/terminus. - Other data layers such as Prisma, Mongoose or Drizzle.
The important thing is that none of them requires a new way of thinking. Modules organize, controllers route, providers work, and the request pipeline keeps everything safe and consistent. We have the mental model, and the rest is practice.
Thanks for building along. Happy coding!
Discussion (0)
Comments are loaded live from this story.
Join the discussion — sign in to like stories and share your thoughts.